Difference between revisions of "Cutipy-MicroPython Bluetooth LE demo"
Kyoungmeyer (talk | contribs) (Add instructions for some new features to the script) |
|||
| (10 intermediate revisions by one other user not shown) | |||
| Line 7: | Line 7: | ||
* CutiPy device running MicroPython | * CutiPy device running MicroPython | ||
* A personal computer | * A personal computer | ||
| + | * [http://git.emacinc.com/micropython-public/micropython-helper-scripts/blob/master/blechat.py blechat.py script] | ||
</cl> | </cl> | ||
| Line 13: | Line 14: | ||
'''ON YOUR PC:''' | '''ON YOUR PC:''' | ||
<cl> | <cl> | ||
| − | 1. Connect your CutiPy to your personal computer using a microUSB cable (Steps | + | 1. Connect your CutiPy to your personal computer using a microUSB cable ([[ Cutipy_Getting_Started | Steps Covered Here ]]) |
* Copy blechat.py into the CutiPy drive | * Copy blechat.py into the CutiPy drive | ||
* Reset your CutiPy board to update the file system | * Reset your CutiPy board to update the file system | ||
| − | * Establish a REPL terminal connection | + | * Establish a REPL terminal connection ([[ Cutipy_Getting_Started | Steps Covered Here ]]) |
* Enter the following commands into the REPL terminal to launch the ''CutiPy's'' bluetooth application | * Enter the following commands into the REPL terminal to launch the ''CutiPy's'' bluetooth application | ||
<syntaxhighlight lang=python> | <syntaxhighlight lang=python> | ||
| Line 82: | Line 83: | ||
* Click '''CONNECT''' | * Click '''CONNECT''' | ||
* On the next screen, click the arrow next to '''Custom Service''' | * On the next screen, click the arrow next to '''Custom Service''' | ||
| − | + | * Clicking on the ‘W’ button (Indicated by red arrow in Figure 2) will bring up a text entry box that will send text to the CutiPy LCD screen | |
| − | * Clicking on the ‘W’ button (Indicated by red arrow) will bring up a text entry box that will send text to the CutiPy LCD screen | + | [[File:BT_SCANNER_2.PNG|300px|left|thumb|Figure 2: BLE SCANNER APP]] <br/> |
| − | [[File: | + | |
| + | |||
| + | |||
| + | |||
| + | |||
| + | |||
| + | |||
| + | |||
| + | |||
| + | |||
| + | |||
| + | |||
| + | |||
| + | |||
| + | |||
| + | |||
| + | |||
| + | |||
| + | |||
| + | |||
| + | |||
| + | |||
| + | |||
| + | |||
| + | |||
| + | |||
| + | |||
| + | |||
| + | |||
| + | |||
| + | |||
| + | |||
| + | <br/> | ||
| + | |||
| + | * Selecting ''Byte Array'' and sending 0001 will turn on LED1, while sending 0000 will turn it off. | ||
* The text 'clear' can be sent to the clear the LCD, 'exit' can be sent to stop the app. | * The text 'clear' can be sent to the clear the LCD, 'exit' can be sent to stop the app. | ||
| + | |||
| + | [[File:BT_SCANNER_3.jpg|300px|left|thumb|Figure 3: BLE SCANNER APP]] <br/> | ||
| + | |||
| + | |||
| + | |||
| + | |||
| + | |||
| + | |||
| + | |||
| + | |||
| + | |||
| + | |||
| + | |||
| + | |||
| + | |||
| + | |||
| + | |||
| + | |||
| + | |||
| + | |||
| + | |||
| + | |||
| + | |||
| + | |||
| + | |||
| + | |||
| + | |||
| + | |||
| + | |||
| + | |||
| + | |||
| + | |||
| + | |||
| + | |||
| + | |||
| + | |||
| + | |||
| + | |||
| + | |||
| + | |||
| + | |||
| + | |||
| + | |||
| + | |||
| + | |||
| + | |||
| + | |||
| + | |||
| + | |||
| + | |||
| + | * Clicking on the 'R' button next to the 'N' button will read the status of Switch 1. | ||
| + | * Clicking on the bottom 'R' button will read a random number generated by the CutiPy's hardware RNG.<br/> | ||
</cl> | </cl> | ||
Latest revision as of 09:56, 13 February 2020
Intro
Here we will demonstrate basic Bluetooth LE (low energy) connectivity between an android device and a CutiPy running MicroPython. The application will connect to the CutiPy via the onboard RS9116 radio module, once connected the user can 'wirelessly' toggle an led and send text messages to the LCD.
Required Materials
-
Android device (Smartphone)
-
CutiPy device running MicroPython
-
A personal computer
Steps
ON YOUR PC:
-
Connect your CutiPy to your personal computer using a microUSB cable ( Steps Covered Here )
-
Copy blechat.py into the CutiPy drive
-
Reset your CutiPy board to update the file system
-
Establish a REPL terminal connection ( Steps Covered Here )
-
Enter the following commands into the REPL terminal to launch the CutiPy's bluetooth application
import blechat
ble = blechat.BleChat('EMAC Demo')  # 'EMAC Demo' can be any string less than about 16 chars
ble.start(demo=True)
The CutiPy bluetooth connection should now be discoverable.
ON YOUR ANDROID DEVICE:
-
Download the BLE Scanner App from the Google Play Store
-
Open the app
-
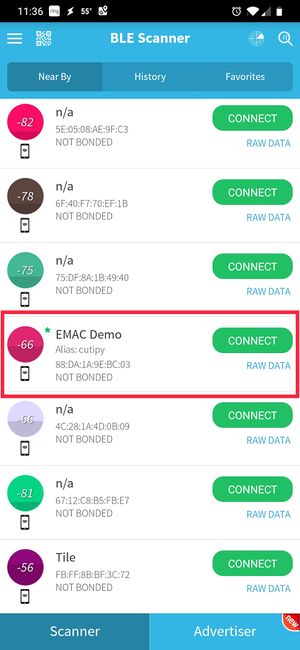
Find the EMAC Demo entry. It will have the Alias cutipy
-
Click CONNECT
-
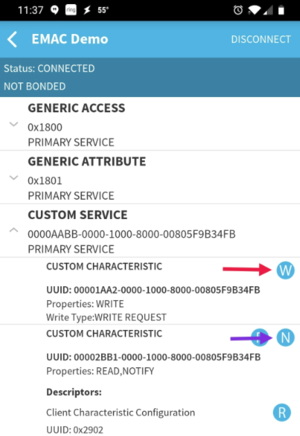
On the next screen, click the arrow next to Custom Service
-
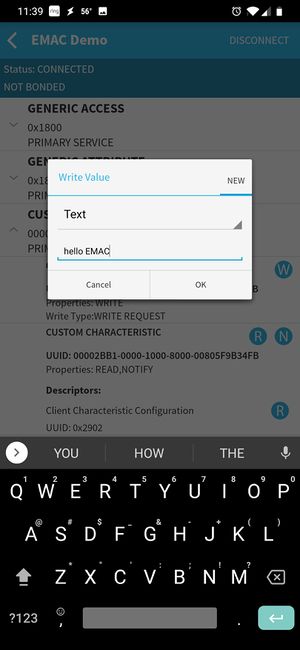
Clicking on the ‘W’ button (Indicated by red arrow in Figure 2) will bring up a text entry box that will send text to the CutiPy LCD screen
-
Selecting Byte Array and sending 0001 will turn on LED1, while sending 0000 will turn it off.
-
The text 'clear' can be sent to the clear the LCD, 'exit' can be sent to stop the app.
-
Clicking on the 'R' button next to the 'N' button will read the status of Switch 1.
-
Clicking on the bottom 'R' button will read a random number generated by the CutiPy's hardware RNG.


