Difference between revisions of "Getting Started with CutiPy and FreeRTOS"
(→Documentation) |
|||
| Line 97: | Line 97: | ||
===Documentation=== | ===Documentation=== | ||
| − | [[CutiPy_FreeRTOS_Documentation | | + | [[CutiPy_FreeRTOS_Documentation | CutiPy FreeRTOS Documentation]] |
[[File:CutipyEditor.png|600px|left|thumb|Figure 2: Qt Creator EMAC Project]] | [[File:CutipyEditor.png|600px|left|thumb|Figure 2: Qt Creator EMAC Project]] | ||
Revision as of 14:40, 18 March 2020
This page outlines a basic guide to getting starting using the Cutipy.
Contents
General Information
Tools Required
- Desktop PC (Windows/Linux/Mac will work)
- Micro-USB to USB Cable
- ST-LINK/V2 in-circuit debugger/programmer for STM8 and STM32 with JTAG 20 pin to SWD 10pin adaptor
Setup
1. Download and install STM32CubeIDE (The IDE used for CutiPy FreeRTOS development, For more information on the STM32CubeIDE click HERE)
2. Download EMAC's CutiPy FreeRTOS project
3. Connect the ST-Link programmer to the CutiPy board for programming
- Connect the 10 pin SWD connector (small ribbon cable) to the CutiPy Board HDR6. Ensure the the painted red wire of the cable is on the same side as the arrow.Connect the other end to the adaptor, again ensuring the arrow is aligned with painted red wire. Connect the ST-Link to the adaptor with the large ribbon cable, and connect the ST-LINK to your desktop with it's provided USB cable
4. Connect your CutiPy to Desktop using the micro-USB to USB cable. Your board is now powered.
5. Open STM32CubeIDE and import the CutiPy FreeRTOS project
- If needed, upgrade your ST-LINK firmware by navigating to Help and selecting ST-LINK Upgrade. The ST Link upgrade window will open. Select refresh device list, and then select Open in update mode, and finally Upgrade
6. Build and upload the firmware
- To build and upload select the debug symbol (To just build select the hammer symbol).
Developing with the Cutipy
1.The baseline CutiPy FreeRTOS build has now been uploaded. Connect to the USB virtual com port on a serial terminal using Putty or TerraTerm. The USB virtual com port driver should install automatically after plugging the CutiPy to your PC. After successful installation of the driver STMMicroelectronics Virtual COM Port should be displayed as an available port. Connect to it as you would any normal serial port.
Note: The USB virtual com port will adjust it's baud rate to that selected by the terminal. It has been tested to work with standard baud rate selections from 110 to 921600.
2.After connecting the CutiPy FreeRTOS menu will be displayed. Navigate to tests for a demonstration of CutiPy functionality.
EMAC CutiPy FreeRTOS Software Description
Project Layout
The CutiPy_FreeRTOS project was developed using the STM32CubeIDE. It contains auto-generated program files and code along with custom files/folders provided by EMAC. Note editing of auto-generated code blocks and files should be avoided as these portions of the project will be overwritten if the auto-code generation feature of STM32CubeIDE is used (STM32CubeMX). Instead we recommend the user create their own custom folders in the project or just use the EMAC provided folder, CutiPy_User for project development.
Custom EMAC folder include:
- CutiPy_Drivers provides custom written EMAC driver functions geared towards use with the CutiPy device. All functions are documented in their respective source files, hence the user should look here for function usage-rules and functionality. The functions written at a CutiPy module (COM A, COM B, SD_CARD, RS9116 radio, etc.) or individual driver level and were written with ease of use in mind.
- CutiPy_Tasks contains the header and source files for the CutiPy freeRTOS for all EMAC provided system tasks. Task descriptions are provided in their respective source files
- CutiPy_User is an empty project folder dedicated for use by the user.
- RS9116_1_2_1 and 'RS9116_1_2_1/examples/utilities contain driver files for the Redpine Signals RS9116 radio module.
The only folders of real importance to the user is the CutiPy_Drivers folder. In addition to containing key driver functions it also contains CP_FRTOS.c that lists system task priority, handle and size, and
Other project folders include:
- Middlewares- contains source files for the USB Virtual Com Port, fatfs (used mainly in conjuction with the sd card), and FreeRTOS.
- Drivers -contains STMicroelectronic's driver files. The user should look here for driver functionality not covered by the provide emac driver files
- Src -contains initialization functions, and main.c
- Inc -contains various include files, but the only one of primary importance FreeRTOSConfig.h file
Software Overview
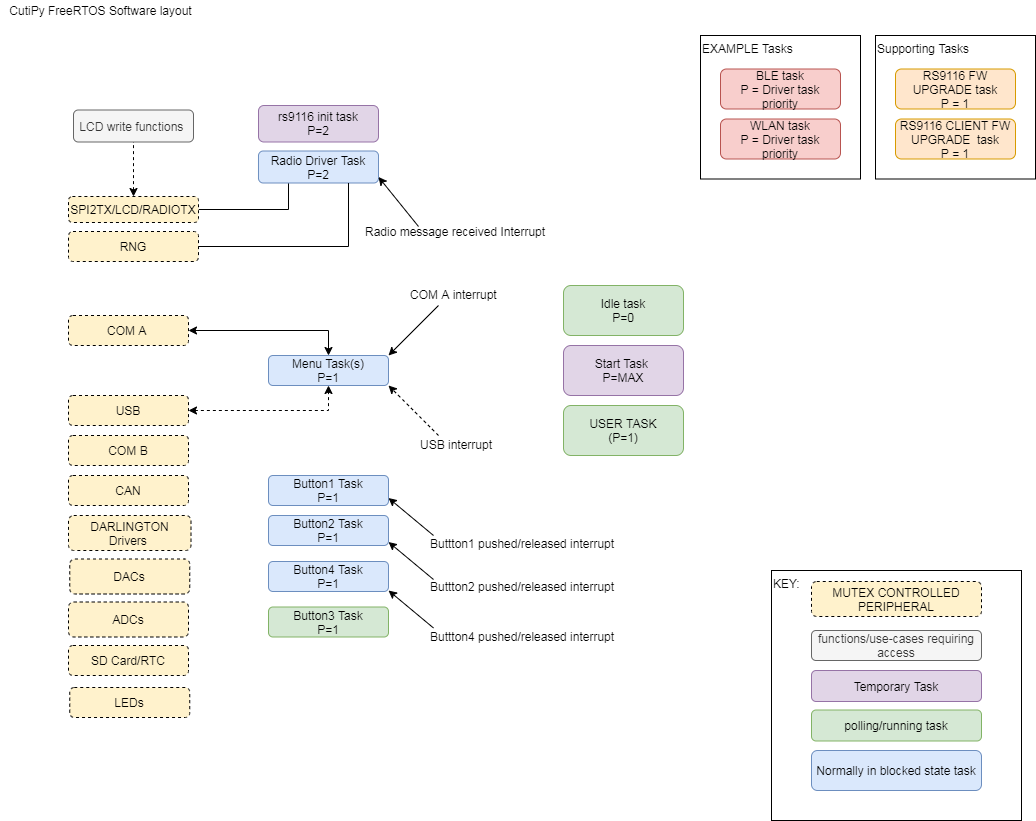
CutiPy RTOS system-level tasks and synchronization have been provided by EMAC to ease user development.
Feature Description
EMAC has provided custom driver functions for the CutiPy's main peripherals. These are located under CutiPy_Drivers. See the source files for function descriptions. All of EMAC's custom functions will be prefixed by CP_ followed by the the DRIVER_NAME. Functions with the prefix CP_FRTOS utilize an RTOS element and should only be called with the scheduler running. We recommend user files be added to the CutiPy_User or that the user add their own custom folders, and not modify the project code directly. EMAC has provide custom system tasks to ease CutiPy use.
ADCs- The CutiPy utilizes the STM32F407's 3 internal ADCs. Thirteen ADC pins are available to the user on HDR2. CP_ADC.c CP_FRTOS functions provide thread safe functionality through mutex control of the 3 ADC's. Aside from 'external' pin sampling this driver file also provide functions for sampling the internal temp sensor, the ram back up battery voltage, and the internal reference voltage (used for calculating the voltage from a raw read)
BATTERIES -
'BUTTONS - Depending on the model of your CutiPy there can be up to 5 buttons, 1 Reset button + 4 user buttons (PB1 through PB4). All user buttons except PB3 are interrupt driven (rising and falling edge), hence there respective tasks block (don't run) until the interrupt is generated. PB3 is polled intermittently enough to avoid missed presses, but not so much as to block out other tasks. Callback functions are provided in CP_BUTTONS.C. The user may simply edit these functions directly, to implement unique callback functionality.
CAN-CAN communication is provided through HDR4 CAN1.
Documentation
Pages with Related Content
CutiPy Micropython Documentation

