Difference between revisions of "Repartitioning a CompactFlash Disk for Linux"
m (→Backup the Existing Filesystem: Fixed grammatical error.) |
|||
| Line 73: | Line 73: | ||
Given the results from these three commands, <code>/dev/sdc</code> is the CF disk. If <code>/dev/sdc1</code> is mounted, it should be unmounted before continuing. <br>'''Do not continue if you are not certain which device node corresponds to the CF disk.''' | Given the results from these three commands, <code>/dev/sdc</code> is the CF disk. If <code>/dev/sdc1</code> is mounted, it should be unmounted before continuing. <br>'''Do not continue if you are not certain which device node corresponds to the CF disk.''' | ||
| − | == | + | == Back Up the Existing Filesystem == |
After determining the CF disk on the system, make a backup of the CF disk to ensure that it can be restored if something goes wrong during the repartitioning process. The steps below assume that <code>/dev/sdc</code> is the CF disk as determined in the example above. Replace the <code>/dev/sdc</code> occurrences with the appropriate device for your system. | After determining the CF disk on the system, make a backup of the CF disk to ensure that it can be restored if something goes wrong during the repartitioning process. The steps below assume that <code>/dev/sdc</code> is the CF disk as determined in the example above. Replace the <code>/dev/sdc</code> occurrences with the appropriate device for your system. | ||
Latest revision as of 15:02, 10 November 2014
The majority of EMAC's x86-based systems utilize CompactFlash as the primary storage device. By default, EMAC OE is provided with a single ext3 partition on the CompactFlash holding the root filesystem. The most efficient method for repartitioning this type of device is using a CompactFlash card reader on a Linux PC. While command-line tools can be utilized, the application gparted is a graphical application that works very well for resizing existing partitions. Follow the procedure below to resize the existing partition and create a secondary partition on a CompactFlash. The procedure can be modified to generate any partition layout desired.
This procedure requires the gparted utility on the Linux PC being used for partitioning the CF disk. If it is not installed, use the package manager (apt, yum, etc) to install the package. |
| The commands used in this procedure can cause complete and total data loss on the Linux system they are being run on if the wrong parameters or options are used. Be extremely careful! |
Contents
Setup
-
Power down the target board and carefully remove the CF disk.
-
Insert the CF disk into the CF reader connected to a Linux PC.
-
The system will most likely bring up a window asking what to do with the device once it is detected. If this occurs, select Do Nothing or a similar option to indicate that the device should not be mounted automatically.
Determine which Device to Use
Next you must determine the device node corresponding to the CF disk. There are several methods that can be used to accomplish this as described in the procedure below:
-
dmesgcan provide information about the disk that was reported by the kernel when it was detected as shown below.developer@ldc:~$ dmesg | tail [7414822.178026] sd 6:0:0:1: [sdc] 4001760 512-byte logical blocks: (2.04 GB/1.90 GiB) [7414822.179094] sd 6:0:0:1: [sdc] Assuming drive cache: write through [7414822.180711] sd 6:0:0:1: [sdc] Assuming drive cache: write through [7414822.180716] sdc: sdc1
In this example,
sdcis the device corresponding to the CF disk. Also note that the size reported matches the expected size for the CF disk (2 GB in this case). The output also shows that a single partition was detected on the device:sdc1. -
The
fdiskcommand can also be used to list the available devices using the-loption. An examplefdisk -loutput is shown below.developer@ldc:~$ sudo /sbin/fdisk -l Disk /dev/sda: 500.1 GB, 500107862016 bytes 255 heads, 63 sectors/track, 60801 cylinders Units = cylinders of 16065 * 512 = 8225280 bytes Disk identifier: 0x00000000 Device Boot Start End Blocks Id System /dev/sda1 * 1 60302 484375783+ 83 Linux /dev/sda2 60303 60801 4008217+ 5 Extended /dev/sda5 60303 60801 4008186 82 Linux swap / Solaris Disk /dev/sdf: 2000.3 GB, 2000398934016 bytes 255 heads, 63 sectors/track, 243201 cylinders Units = cylinders of 16065 * 512 = 8225280 bytes Disk identifier: 0x0b45dffc Device Boot Start End Blocks Id System /dev/sdf1 1 243201 1953512001 83 Linux Disk /dev/sdc: 2048 MB, 2048901120 bytes 64 heads, 62 sectors/track, 1008 cylinders Units = cylinders of 3968 * 512 = 2031616 bytes Disk identifier: 0x6a5f7029 Device Boot Start End Blocks Id System /dev/sdc1 * 1 1008 1999871+ 83 Linux
Three devices are listed in this output:
/dev/sda,/dev/sdc, and/dev/sdf. Looking at the disk sizes,/dev/sdcmatches the 2 GB size of the CF card (2048 MB as listed in the output above). -
After checking the
dmesgandfdiskoutput, inspect the mount locations on the system to verify that the correct disk is being used and that it has not been mounted by the system. In the example below, thegrepcommand is used to search the output of themountcommand for the string "/dev/sd".developer@ldc:~$ mount | grep /dev/sd /dev/sda1 on / type ext3 (rw,errors=remount-ro) /dev/sdf1 on /media/backup type ext3 (rw)
This output illustrates that
/dev/sda1is the root filesystem,/dev/sdf1is an auxiliary disk mounted on/media/backup, and/dev/sdc1is not mounted.
Given the results from these three commands, /dev/sdc is the CF disk. If /dev/sdc1 is mounted, it should be unmounted before continuing.
Do not continue if you are not certain which device node corresponds to the CF disk.
Back Up the Existing Filesystem
After determining the CF disk on the system, make a backup of the CF disk to ensure that it can be restored if something goes wrong during the repartitioning process. The steps below assume that /dev/sdc is the CF disk as determined in the example above. Replace the /dev/sdc occurrences with the appropriate device for your system.
-
Begin by mounting the CF disk. It is important to do this manually rather than having the system auto-mount the device to prevent it from being mounted with options that could make it difficult to obtain a complete archive. The listing below demonstrates how to mount the CF disk to a temporary directory:
developer@ldc:~$ sudo mkdir /mnt/cf
developer@ldc:~$ sudo mount /dev/sdc1 /mnt/cf
After mounting, inspect the files at the mount point and verify that the filesystem is there as expected:
developer@ldc:~$ ls /mnt/cf
bin  boot  dev  etc  home  lib  lost+found  media  mnt  proc  root  sbin  sys  tmp  usr  var
-
Use
tarto create a gzipped tar archive of the entire flash. The following commands will create a backup archive named/home/developer/rootfs-backup/rootfs_20130404.tar.gz:developer@ldc:~$ cd /mnt/cf developer@ldc:~$ sudo tar czvf ~/rootfs-backup/rootfs_20130404.tar.gz *
-
Unmount the CF disk once the backup is complete:
developer@ldc:~$ cd
developer@ldc:~$ sudo umount /dev/sdc1
Repartition the CF Disk using Gparted
At this point you will need to decide on a partition scheme to use. In this example, the primary partition and ext3 filesystem will be resized to 200 MB and a new primary partition will be created. Depending on your application requirements, you could create multiple primary partitions, or an extended partition with multiple logical partitions.
Follow the steps below to repartition the CF disk.
Note that gparted will not apply any of the changes that are made to the disk partitions until the "Apply" button is pressed. |
-
Start the
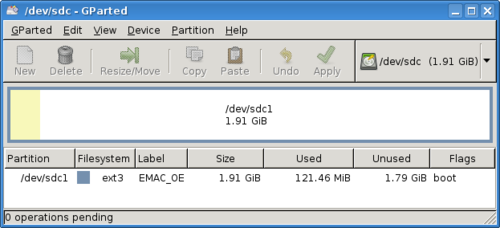
gpartedutility, passing the CF disk device node as an argument as shown below:developer@ldc:~$ sudo gparted /dev/sdcThis should bring up a window similar to the one shown in Figure 1.
-
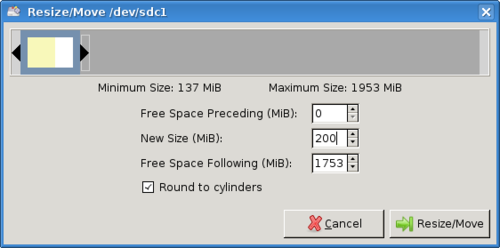
Click on the partition to select it and press the Resize/Move button. Enter 200 in the New Size (MiB) setting in the new window that appears as shown in Figure 2. Press Resize/Move to queue this operation and return to the main window.
-
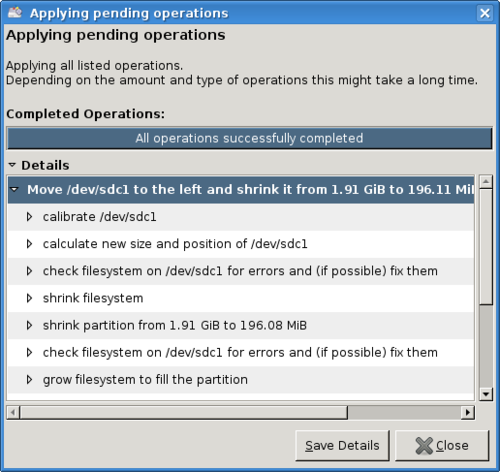
You should now see the primary partition followed by a large unallocated section. Although it is acceptable to continue making all changes before applying the changes, it can be advantageous to apply changes in steps. Press the Apply button to execute the pending operations required to resize the root partition and filesystem. A window will appear with the operations and their status. You may view details for each operation as it is executed. See Figure 3 for an example. Press Close to return to the main window once all operations have completed.
-
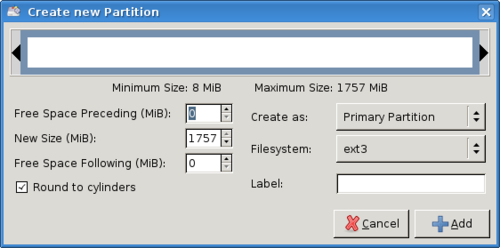
To create a new partition in the unallocated portion of the disk, click on the unallocated section to select it and press the New button. A new window will appear to enter the details for the partition. After entering the settings below (also shown in Figure 4), press Add to queue the required operations.
-
Create as: Primary partition
-
Filesystem: ext3
-
Use the maximum allowed size for the New Size setting
-
-
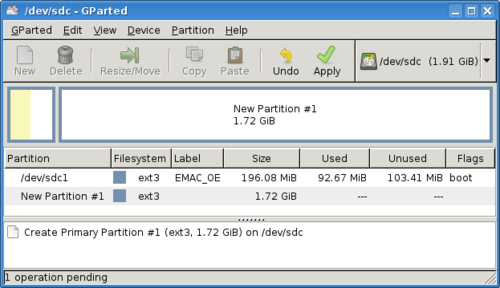
At the main window the device layout should reflect the new partition as shown in Figure 5. Press Apply to commit the changes to the disk.
-
After all operations finish, verify the device layout and partition table as shown in the main window of
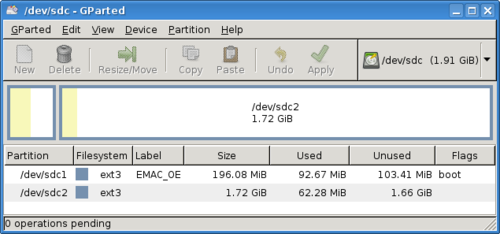
gparted. Figure 6 shows that/dev/sdc1is the resized root filesystem and that/dev/sdc2is the new data partition. -
Close
gpartedand remove the CF disk from the reader.
Configure the Target Board
After repartitioning the CF disk, it is necessary to configure the target board to tell it where and how to mount the new partition. In this example, the new partition will be mounted on /mnt/data but any mount point may be used.
-
Insert the CF disk into the target board and apply power to the system.
-
Log in as the root user after the system has booted.
-
Verify the root disk and partitioning using the
fdiskcommand as shown below.root@emac-oe:~# fdisk -l Disk /dev/sda: 2048 MB, 2048901120 bytes 255 heads, 63 sectors/track, 249 cylinders Units = cylinders of 16065 * 512 = 8225280 bytes Device Boot Start End Blocks Id System /dev/sda1 * 1 25 200781 83 Linux /dev/sda2 26 249 1799280 83 Linux
The output above shows that
/dev/sdais the CF disk on this system and the new partition scheme was recognized correctly. -
Add an entry to the system file,
/etc/fstab, to specify the mount parameters. Note that depending on the system, the new partition may be auto-mounted as a removable storage device. In this case, it was mounted on/media/sda2as shown from themountcommand:root@emac-oe:~# mount | grep sda2 /dev/sda2 on /media/sda2 type ext3 (rw,sync,relatime,errors=continue,barrier=1,data=writeback)
Even if the device is auto-mounted, EMAC recommends adding an entry to the
fstabto specify the exact parameters for mounting the new partition as described below.-
Create the new mount point:
/mnt/data.root@emac-oe:~# mount -o remount,rw / root@emac-oe:~# mkdir /mnt/data
-
Edit the
fstabto specify the new mount. For CF disks using ext3, EMAC recommends specifying the following mount parameters:noatime,barrier=1,data=journal. (See this page for more information on how to edit a file.)root@emac-oe:~# vi /etc/fstabMake the following entry in the file from
vi:/dev/sda2 /mnt/data ext3 rw,noatime,barrier=1,data=journal 0 0 -
Mount the partition with the new settings and verify that it mounts correctly.
root@emac-oe:~# mount -o remount,ro /
root@emac-oe:~# umount /dev/sda2
root@emac-oe:~# mount /dev/sda2
root@emac-oe:~# mount | grep sda2
/dev/sda2 on /mnt/data type ext3 (rw,noatime,errors=continue,barrier=1,data=journal)
-
Modify any necessary applications to store data on the new partition.
-
