Difference between revisions of "Help:Page validation"
(Created page with "{{todo| NotStarted (10.13.2015-14:51->JJ+)|Jeffrey Jung| project=OE 5.0,JJ }} {{#seo: |title=Wireless Networking |titlemode=append |keywords= |description=How to access a wire...") |
|||
| Line 75: | Line 75: | ||
{{:Templateimpl:conclusion | initials=JJ | title=Wireless Networking | desc=How to access a wireless network | project=OE 5.0 }} | {{:Templateimpl:conclusion | initials=JJ | title=Wireless Networking | desc=How to access a wireless network | project=OE 5.0 }} | ||
| − | This page walks through | + | This page walks through the procedure to set up a module to a wireless connection, as well as acquiring the necessary tools to make the connection the first time. |
<!-- {{:Templateimpl:moreinfo | initials=JJ | title=Wireless Networking | desc=How to access a wireless network | project=OE 5.0 }} | <!-- {{:Templateimpl:moreinfo | initials=JJ | title=Wireless Networking | desc=How to access a wireless network | project=OE 5.0 }} | ||
Revision as of 15:27, 15 October 2015
This guide will illustrate how to set up and connect to a wireless network using the ThinkPenguin Wireless N USB Adapter for GNU/LINUX and the built-in WiFi on the SoM-200GS.
Contents
Background
Most modules from EMAC can be upgraded to use wireless networking via a USB adapter. The USB adapter can be purchased at the ThinkPenguin website. EMAC's SoM-200GS carrier can optionally be ordered with built-in WiFi and bluetooth.
General Information
Setup
- This process requires modifying some system files so start by allowing the system to read and write.
root@ipac9x25:~#mount -o remount,rw /
- Check for any updates.
root@ipac9x25:~#opkg update
- Install wpa-supplicant to allow connection to WPA AND WPA2 protected networks.
root@ipac9x25:~#opkg install wpa-supplicant
- Install the firmware for the USB adapter.
root@ipac9x25:~#opkg install linux-firmware-ath9k
- Install the marvel firmware and the sd8787 firmware for built-in WiFi on the SoM-200GS.
root@som9g45:~#opkg install linux-firmware-marvel-licenseroot@som9g45:~#opkg install linux-firmware-sd8787
- Install the iw and wireless-tools packages.
root@ipac9x25:~#opgk install iw
root@ipac9x25:~#opkg install wireless-tools
- Once everything has successfully installed, reboot the system. If you're using the USB adapter, plug in the adapter upon successful login.
- More configuration to system files is required to establish a connection to the network. Mount the file system to read and write.
root@ipac9x25:~#mount -o remount,rw /
Wireless Networking
After setup of the required software is complete, the connection may be established.
1. Use iw to scan for nearby wireless networks.
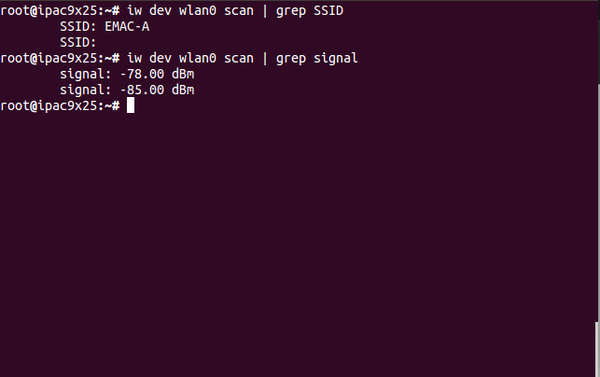
root@ipac9x25:~#iw dev wlan0 scan- This will produce a list of nearby networks and detailed information about each network includeing SSID, the type of security, frequency, and signal strength. Use grep to help make identifying the SSID and signal strength easier. For the signal strength, the closer the value is to 0, the stronger the signal is.
2. For an open network, simply uncomment the lines in /etc/wpa_supplicant.conf:
###open network
#network={
#      ssid="your-ssid" (optional)
#      scan_ssid=1
#       key_mgmt=NONE
#}
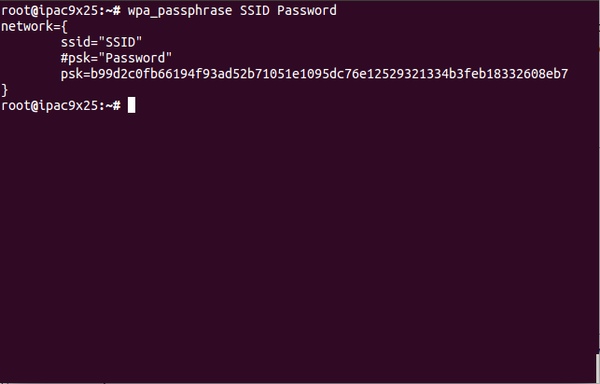
3. For a WEP password protected network, use wpa_passphrase to generate the private shared key(psk).
- SSID is the SSID of the preferred network found when scanning with iw. Password is the password to connect to the network.
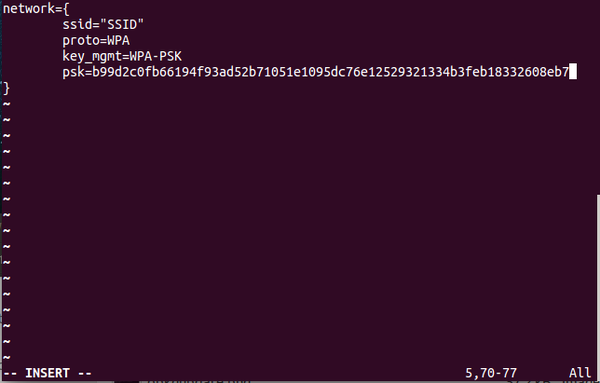
4. Highlight the psk and copy it.
5. Edit /etc/wpa_supplicant.conf to have the appropriate SSID and psk
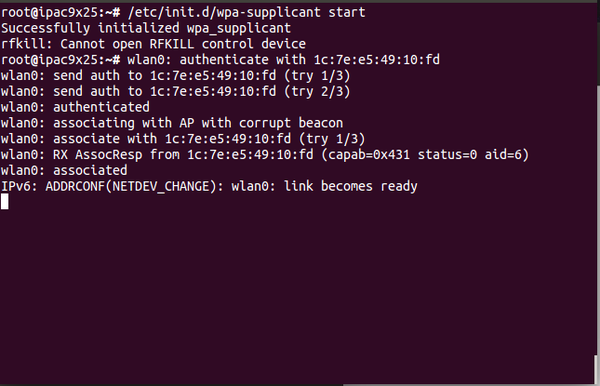
6. Make the connection to the network using the path /etc/init.d/wpa_supplicant with the argument "start"
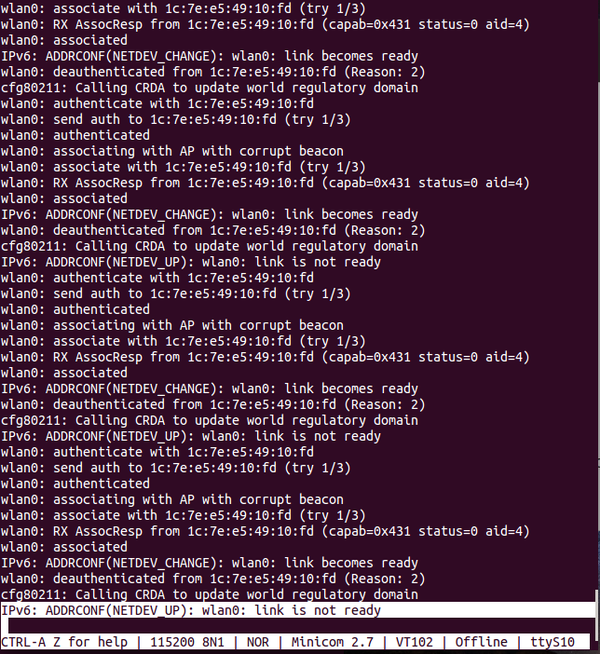
root@ipac9x25:~#/etc/init.d/wpa_supplicant start- Give the command some time to establish the connection. Watch the terminal for output from the command. A connections has been established when output stops and the last line read "IPv6 ADDRCONF(NETDEV_CHANGE):wlan0: link becomes ready". A connection has failed if "IPv6: ADDRCONF(NETDEV_UP):wlan0: link is not ready" is seen repeatedly and output to the terminal continues.
- Successfull connection (waiting a full minute to ensure output to the terminal stopped);
- Failed connection (waiting more than a minute as output continues to print to the terminal). The highlighted line and the repeated lines indicate an issue establishing the connection.
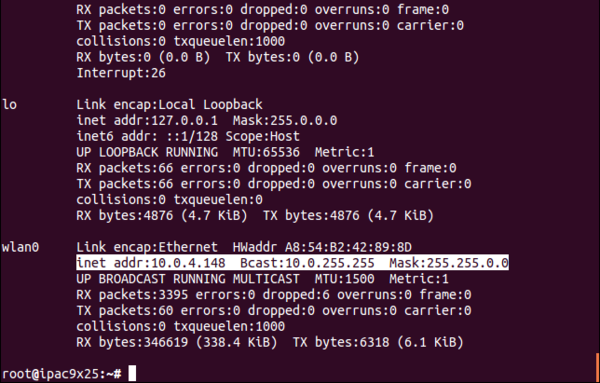
7. Confirm there is an IP address under wlan0 with the ifconfig command
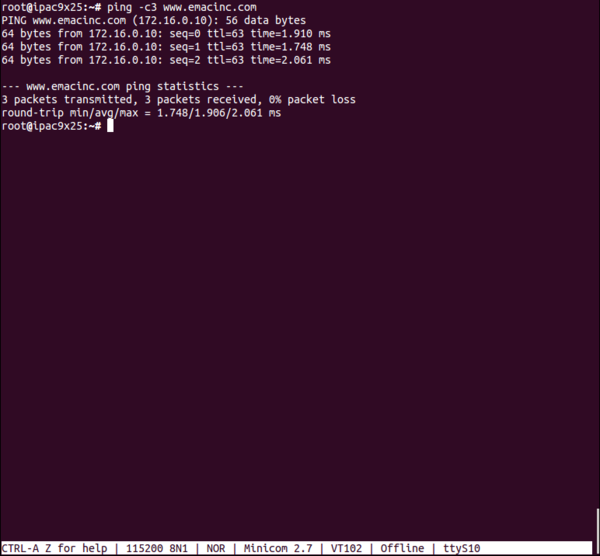
8. Disconnect any ethernet connections and ping to www.emacing.com to verify that the system can wirelessly connect to the Internet.
Conclusion
This page walks through the procedure to set up a module to a wireless connection, as well as acquiring the necessary tools to make the connection the first time.
