Example getkey
This is a guide to the getkey C example project included in the EMAC OE SDK.
What project is complete without a cool little keypad for entering your id/phone number/launch codes? Or how about a retro game controller? Interactive art? The getkey example project shows you how to pass data to a SOM-150ES carrier board via a cheap membrane keypad. It shows you how to specify, inspect and test associations between character-data and keypad-keys. It also shows you how to turn key-presses into character-data using the same techniques as the big keyboard on your PC. So if you are planning to, say, write a custom keyboard driver, then this is a great introduction to the deeply relevant mysteries of matrix encoding (see below).
Furthermore, this C example project is an excellent and low-pain example of how to write a Linux OE device driver. You too can talk to obscure hardware with barely more lines than a hello world. Amaze pets with your L33t low-level Linux programming abilities!
Contents
- 1 Opening, Building and Uploading the Project Files
- 2 Usage and Behavior
- 2.1 Hardware Requirements
- 2.2 Plugging the Keypad into the SOM-150ES Carrier Board
- 2.3 The Keypad Matrix File
- 2.4 Using getkey
- 2.5 Usage Example. Mapping a Keypad Device Node to a Keypad Matrix File
- 2.6 Usage Example. Displaying the Character Presently Associated With a Key on the Keypad
- 2.7 Usage Example. Displaying the Character Matrix Presently Associated with the Keypad
- 3 Summary
Opening, Building and Uploading the Project Files
1. Open the C/C++ editing perspective.
stub
2. Open the getkey project files.
stub
3. Build the getkey project.
stub
4. Upload the getkey binary to the target machine.
stub
Usage and Behavior
Hardware Requirements
To use the getkey program you will need the following hardware.
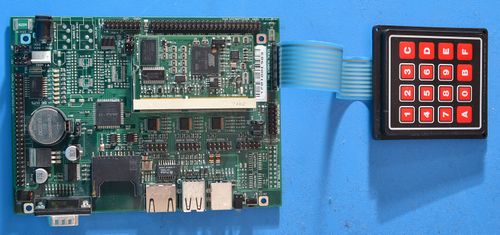
- A SOM-150ES carrier board (Available from EMAC).
- A compatible SoM for that carrier board (SOM-9260M, SOM-9G20M and SOM-9X25 are all compatible and available from EMAC).
- A compatible keypad (Available from EMAC, refer to item# E20-21 or E020-25. Datasheet).
SOM-150ES carrier board with keypad
Plugging the Keypad into the SOM-150ES Carrier Board
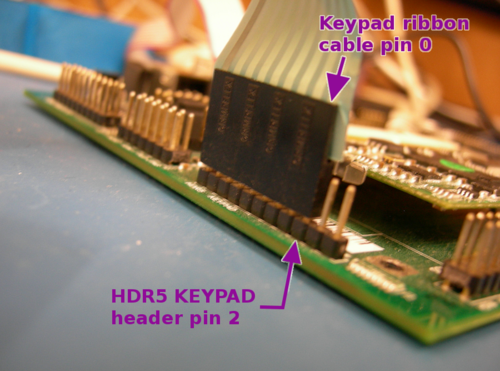
Plug the keypad into the HDR5 KEYPAD header of the SOM-150ES Carrier Board.
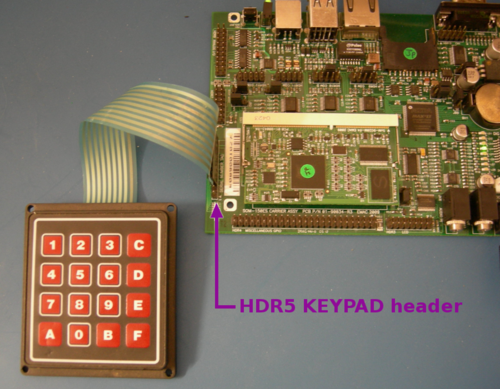
Make sure that you line up pin 0 of the keypad's ribbon cable with pin 2 of the header.
The Keypad Matrix File
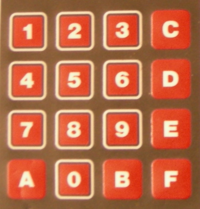
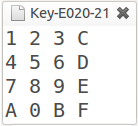
The keypad matrix file specifies associations between keypad-keys and characters. For each key in the keypad's grid of keys we specify a character in a grid of characters.
In this example we see an E020-21 keypad on the left and an example keypad matrix file (Key-E020-21, included in the project) opened in a text editor on the right. You can edit the character matrix any way you like.
Using getkey
The getkey program is controlled from the console via command line parameters. You can specify the keypad device node, specify the keypad matrix file (see notes on the keypad matrix file, above), display the current matrix in the console and test individual character-key associations.
./getkey [-d device -b -g -s file]
- -d
- Specify the keypad device node. The default is
/dev/keypad - -b
- Test an individual key-character association (via "read blocking"). The program will sleep until a key on the keypad is pressed, then output that key's character to the console.
- -g
- Outputs the current keypad matrix (see notes on the keypad matrix file, above) to the console.
- -s
- Specify the keypad matrix file. (see notes on the keypad matrix file, above). If a keypad matrix file is not specified then the character associated with the last keypad key pressed is returned.
Note on parameter order. Parameters are evaluated in order. If blocking (b) or device specifications (d) are used, they must be declared before the matrix arguments on the command line.
Usage Example. Mapping a Keypad Device Node to a Keypad Matrix File
./getkey -d /dev/keypad0 -s /path/to/this/file/Key-E020-21
The program will map the keypad at the device node /dev/keypad0 to the matrix file Key-E020-21. This associates each character in the grid of characters in the matrix file (see notes on the keypad matrix file, above) with a key in the grid of keys on the keypad.
Usage Example. Displaying the Character Presently Associated With a Key on the Keypad
./getkey -d /dev/keypad0 -b
The program will wait until a key is pressed on the keypad. When a key is pressed it will display the character associated with that pressed key, as specified in the keypad matrix file (see notes on the keypad matrix file, above).
For example:
root@som9g20:/tmp# ./getkey -d /dev/keypad0 -b
5
root@som9g20:/tmp#
In this case I pressed the 5 key on the keypad.
Usage Example. Displaying the Character Matrix Presently Associated with the Keypad
./getkey -d /dev/keypad0 -g
The program will display the character matrix (see notes on the keypad matrix file, above) presently associated with the keypad at /dev/keypad0.
root@som9g20:/tmp# ./getkey -d /dev/keypad0 -g
1 2 3 C
4 5 6 D
7 8 9 E
A 0 B F
root@som9g20:/tmp#
The character matrix displayed here is that of the Key-E020-21 file.
Summary
The getkey example C project introduced us to working with SOM-150ES carrier boards and its compatible keypads. I hope you found this guide illuminating.
