Getting Started with the IIoT Development Kit IMX6U-112
This page outlines a basic guide to getting starting using the IIoT Development Kit IMX6U-112.
Contents
General Information
What Comes with the Development Kit
- SoM-IMX6U-120R2 (528MHz iMX6UL 4GB eMMC, 128MB SoM, connected to Carrier Board)
- SoM-112ES-131R1 (Dlx Carrier with Wifi/BT & Audio)
- 5V 3A Wall Power Supply
- 10 Pin Com to DB9 Cable 12"
- RJ45 to RJ45 Ethernet Cable 7'
- USB2.0A Male to Micro-USB Male 6'
- 2.4 & 5GHz 100mm Wifi Antenna
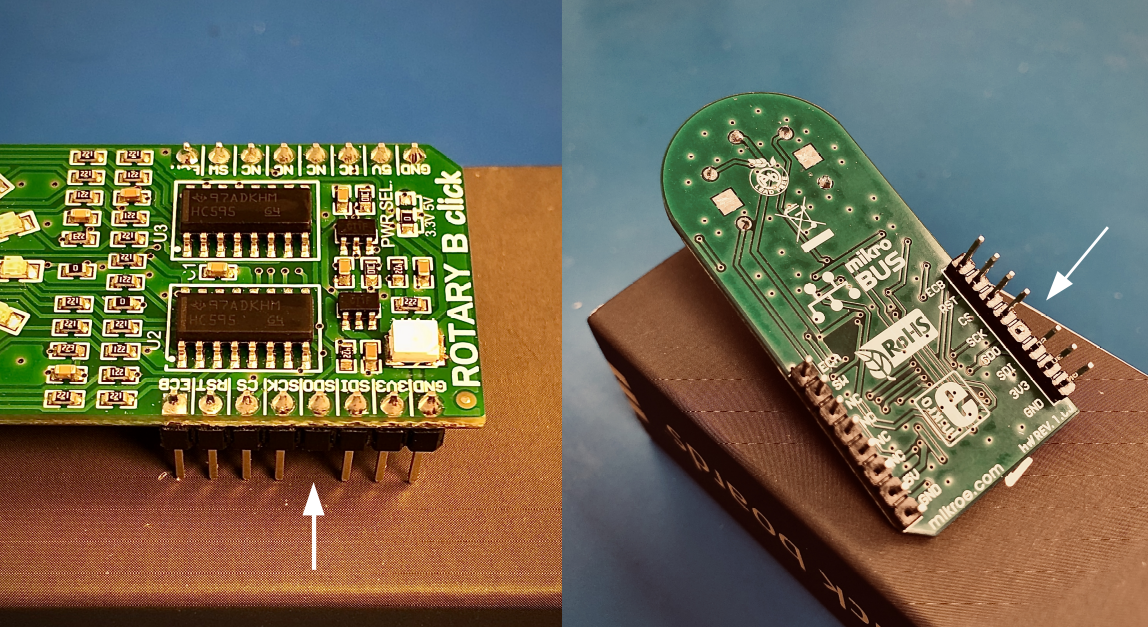
- MikroBus ROTARY B click
Tools Required
- Desktop PC (Windows/Linux/Mac will work)
Setup
1. Install EMAC OE SDK on your computer.
- Installation options are linked HERE.
2. Make the following cable connections using the cables provided:
- Board Micro-USB to USB Desktop
- Board Ethernet to Ethernet Network
- 5V Wall Power Supply to Board Power (may be left unplugged from wall until Step 4)
3. Open your preferred serial monitoring program:
- On Windows use PuTTY: https://www.putty.org/
- On Linux or Mac use Minicom
4. Create a terminal session with the board.
- After supplying power, boot messages will be displayed followed by a log in prompt.
- User: root
- Password: emac_inc
- Use command "ifconfig" in the terminal session to find the device's IP address that can be used during the development process.
Development
There are two options in development with this device:
1. Using the EMAC OE SDK on terminal. [ Getting Started with the EMAC OE SDK ]
- or
2. Using the EMAC OE SDK on Qt Creator. [ Getting Started With Qt Creator ]
MikroBus Rotary B Click
EMAC has provided a MikroBus Rotary B Card which provide a number of LEDs and a Rotary Switch to allow for easy demonstration and interaction of the Eval Kit. Demo/Example Software is provided that interacts with this Card. This Software can be modified by the user as an exercise is using the development tools.
NOTE: Do to a design flaw in the MikroBus Rotary B Card which does not allow another SPI device to be present on the SPI Bus. The SoM-IMX6U uses the SPI Bus and the presence of MikroBus Rotary B Card prohibits the SOM from booting.
To alleviate this issue, the pin labeled “SDO” must be cut and jumpers JB5 and JB6 must be set to 3P3 (see figures below).
