Creating New Projects with Eclipse
The purpose of this guide is to demonstrate how to create a new project in Eclipse using the EMAC Open Embedded SDK. This will include a step-by-step procedure which assumes that the SDK has already been imported .
Since this guide is specific to the EMAC OE SDK, it is not interchangeable with a general guide on creating a new Eclipse project.
Contents
Required Tools
- GNU Make
- EMAC Eclipse 3.6
- EMAC OE SDK
New Project Setup
Before getting started creating a new project, the following setup must be performed. It is up to the application developer whether the new project will be placed in the EMAC-OE-arm-linux-gnueabi-SDK_XX.YY/projects project folder in the Eclipse Project Explorer View or within its own project folder. The latter does involve more complexity during setup, though it is a bit neater to work with since it does not require the developer to navigate the SDK directory tree to get to the new project. Note that only one of the following subsections is necessary to move on to the General Setup Section.
Creating a New SDK Project
-
Make sure that the SDK has been configured according to Configuring the SDK
-
Start Eclipse.

When Eclipse starts, the user will be prompted to choose a workspace location. The recommended location is /path/to/sdk/projects. This will allow the user to easily leverage the use of the SDK. If a different location is chosen, see the section below on alternate project locations.
-
From the workspace, select File->New->Project
-
Under C/C++, select C Project then next
-
In the C Project dialog window, enter “hello” in the Project name: field.
-
Scroll down and choose Makefile Project -> Empty Project in the Project type: list.
-
Ensure that – Other Toolchain – is selected in the Toolchains: list.
-
Click the Finish button.
-
Select Yes to open the C/C++ perspective if prompted
-
The workbench should look similar to Figure 4 below.


General Setup
Generate Eclipse Make Targets
The following will demonstrate how to add the all, clean and upload targets for make
-
Click on the Make Target view tab in the right hand pane.
If the Make Target tab is not visible, select Window -> Show View -> other... from the Eclipse toolbar. Then select Make -> Make Target. -
Right click on hello to bring up the context menu.
-
Select New...
-
Create the make targets all, clean and upload as in figures 5,6 and 7.
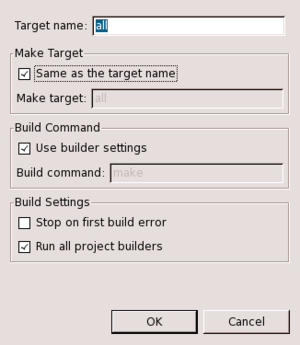
Figure 5: Make New All Target
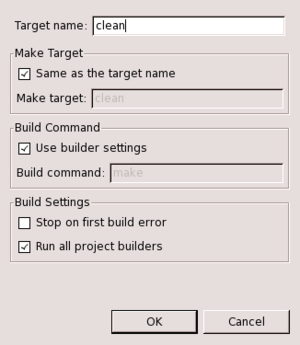
Figure 6: Make New Clean Target
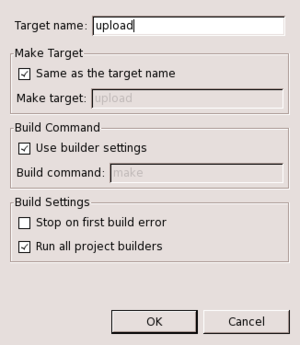
Figure 7: Make New Upload Target


Modify the Makefile
Once the Make Targets have been created, a Makefile needs to be created that contains the same targets so that GNU make knows how to compile and link the source into a binary that will run on the target machine. See the Makefile modification section of the EMAC OE SKE New Project guide for more explanation.
Alternate Project Locations
If the project is created outside of the /path/to/sdk/projects directory, the paths present in the make file and path to the SDK and global.properties files will need to be modified as below.
-
Copy the correct global.properties file from the SDK/projects directory to the current project directory
cp -L /path/to/sdk/projects/global.properties /path/to/project/hello
-
Modify the include line at the top of the make file to refer to the new global.properties file
include global.properties -
Change the value of
SDKBASEin global.properties to point to the location of the SDK installation.
Using the New Project
The next step is to write some example C code for the project. See Write the C Code section of the EMAC OE SKE New Project guide for more explanation.
-
Open the C/C++ Perspective if it is not open already.
-
From the Eclipse menubar, select Window -> Open Perspective -> Other...
-
Select C/C++ and click OK
-
-
Create a new C file using the Eclipse New Source Wizard.
-
From the Eclipse menubar, select File-> New-> Source File.
-
Set the Source File: field to hello.c
-
Set the value of Template: to <None>
-
Click Finish
-
-
If the new C file did not open automatically, open it by double clicking hello.c the the left pane
-
Copy the code from Listing 1. in the C code writing section of the EMAC OE SKE New Project guide.
-
Save the file by selecting File->Save from the Eclipse menubar. See figure 8 for how Eclipse should look.

Cross-Compile
To build the project, ensure the project is highlighted in the Project Explorer treeview in the left pane, then select Project->Build Project. The project will now build, and your window should appear similar to figure 9.

If there are any build errors, they will be shown in the Console and/or Problems tabs on the bottom.
see http://wiki.emacinc.com/doku.php?id=linux:eclipse:newsdkproject
See Also
Compile and Run procedure from the Eclipse Example Project Guide to compile the project. Note: There may be differences between