Difference between revisions of "Creating a New EMAC OE SDK Project with qmake in Qt Creator"
| (7 intermediate revisions by 3 users not shown) | |||
| Line 1: | Line 1: | ||
| − | {{todo| | + | {{todo| Complete (11.10.2015-12:42->JJ+);(11.11.2015-16:05->JJ+);(11.12.2015-12:30->JJ+);(11.12.2015-14:30->MG+);(11.12.2015-14:50->JJ+);(11.12.2015-15:00->MG+);(11.12.2015-15:15->KY+)|Jeffrey Jung| project=OE 5.0,JJ,Complete,MG,KY }} |
{{#seo: | {{#seo: | ||
|title=Creating the Project | |title=Creating the Project | ||
|titlemode=append | |titlemode=append | ||
| − | |keywords=qmake, Qt Creator | + | |keywords=qmake, Qt Creator, Qt applications |
|description=Creating a New EMAC OE SDK Project with qmake in Qt Creator | |description=Creating a New EMAC OE SDK Project with qmake in Qt Creator | ||
}} | }} | ||
| Line 11: | Line 11: | ||
<!-- /*********************************************************************************************************/ --> | <!-- /*********************************************************************************************************/ --> | ||
<!--<span style="background:#00FF00;color:#FF0000;font-size:300%">'''''Put the page description text here.'''''</span>--> | <!--<span style="background:#00FF00;color:#FF0000;font-size:300%">'''''Put the page description text here.'''''</span>--> | ||
| − | Alongside the EMAC OE 5. | + | Alongside the EMAC OE 5.X SDK, EMAC provides the Qt Creator IDE(Interactive Development Environment). A great feature of this IDE is its UI design tool that will allow developers to produce applications with a GUI for EMAC devices equipped with LCD displays. The UI is constructed by dragging and dropping objects to the application UI. Using slots and signals, developers can easily program a functional, interactive, and visually pleasing interface. These project requires Qt Creator's tool <code>qmake</code> to build these applications. |
__TOC__ | __TOC__ | ||
| Line 18: | Line 18: | ||
<!-- /*********************************************************************************************************/ --> | <!-- /*********************************************************************************************************/ --> | ||
{{:Templateimpl:bg | initials=JJ | title=Creating the Project | desc=Creating a New EMAC OE SDK Project with qmake in Qt Creator | project=OE 5.0 }} | {{:Templateimpl:bg | initials=JJ | title=Creating the Project | desc=Creating a New EMAC OE SDK Project with qmake in Qt Creator | project=OE 5.0 }} | ||
| − | The user interface (UI) designer tool in Qt Creator can be used to develop applications reliant on a UI. Written in C++, these applications built using the EMAC OE SDK can be deployed to EMAC carriers equipped with touch screen displays. Developers will be able to create software that is much more interactive with the user. For more information about Qt Creator, go to http://wiki.qt.io/ | + | The user interface (UI) designer tool in Qt Creator can be used to develop applications reliant on a UI. Written in C++, these applications built using the EMAC OE SDK and the <code>qmake</code> tool can be deployed to EMAC carriers equipped with touch screen displays. Developers will be able to create software that is much more interactive with the user. For more information about Qt Creator, go to the [http://wiki.qt.io/Qt_Creator_Guidance Qt Creator Guidance] page. |
<!-- /*********************************************************************************************************/ --> | <!-- /*********************************************************************************************************/ --> | ||
| Line 24: | Line 24: | ||
<!-- /*********************************************************************************************************/ --> | <!-- /*********************************************************************************************************/ --> | ||
{{:Templateimpl:geninfo | initials=JJ | title=Creating the Project | desc=Creating a New EMAC OE SDK Project with qmake in Qt Creator | project=OE 5.0 }} | {{:Templateimpl:geninfo | initials=JJ | title=Creating the Project | desc=Creating a New EMAC OE SDK Project with qmake in Qt Creator | project=OE 5.0 }} | ||
| − | This page will present a guide to create a basic application using Qt Creator. You'll not only write the source code, but also design a UI for the application. Once that is done, you'll compile the project and deploy it to run on a remote target machine. A "Hello World" project is used as an example to demonstrate how to use the UI designer and receive output | + | This page will present a guide to create a basic application using Qt Creator. You'll not only write the source code, but also design a UI for the application. Once that is done, you'll compile the project and deploy it to run on a remote target machine. A "Hello World" project is used as an example to demonstrate how to use the UI designer and receive output from the IDE. |
<!-- /*********************************************************************************************************/ --> | <!-- /*********************************************************************************************************/ --> | ||
| Line 30: | Line 30: | ||
<!-- /*********************************************************************************************************/ --> | <!-- /*********************************************************************************************************/ --> | ||
{{:Templateimpl:using | initials=JJ | title=Creating the Project | desc=Creating a New EMAC OE SDK Project with qmake in Qt Creator | project=OE 5.0 }} | {{:Templateimpl:using | initials=JJ | title=Creating the Project | desc=Creating a New EMAC OE SDK Project with qmake in Qt Creator | project=OE 5.0 }} | ||
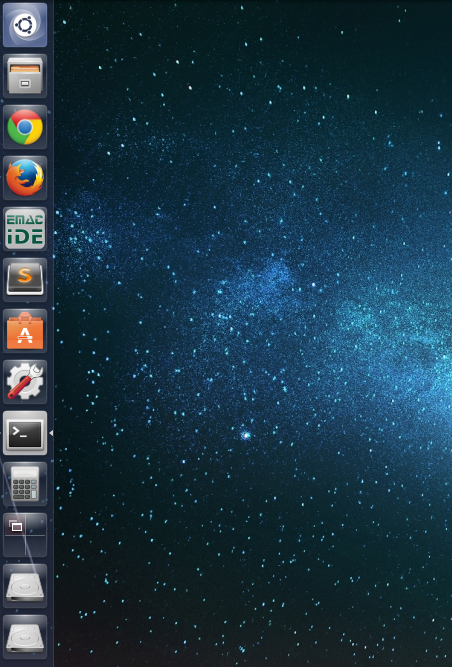
| − | <cl>1. Launch the EMAC Qt Creator.<br />[ | + | <cl>1. Launch the EMAC Qt Creator. <br /><br /> |
| + | [[File:EMAC_Qt_Creator_Icon.png]] | ||
| + | <br /><br /> | ||
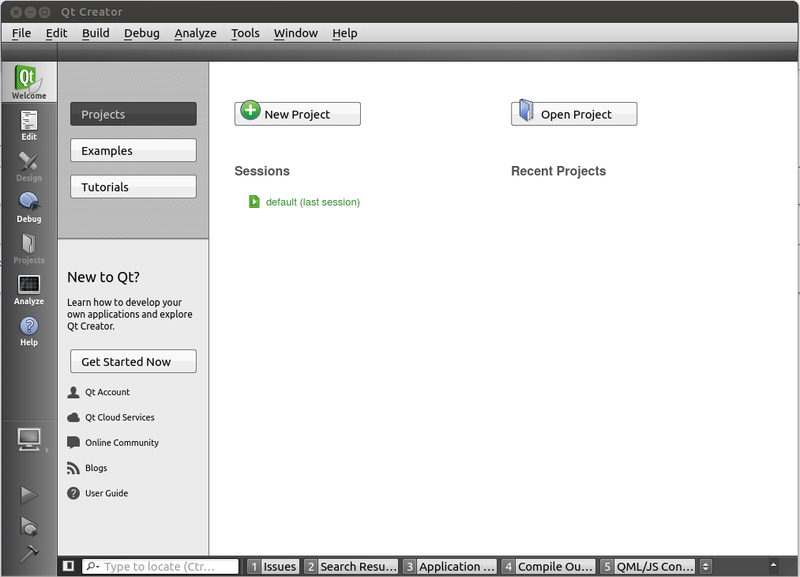
| − | * Click on "New Project".<br />[ | + | * Click on "New Project".<br /><br /> |
| + | [[File:Qtcreator_gui.png|800px]] | ||
| + | <br /><br /> | ||
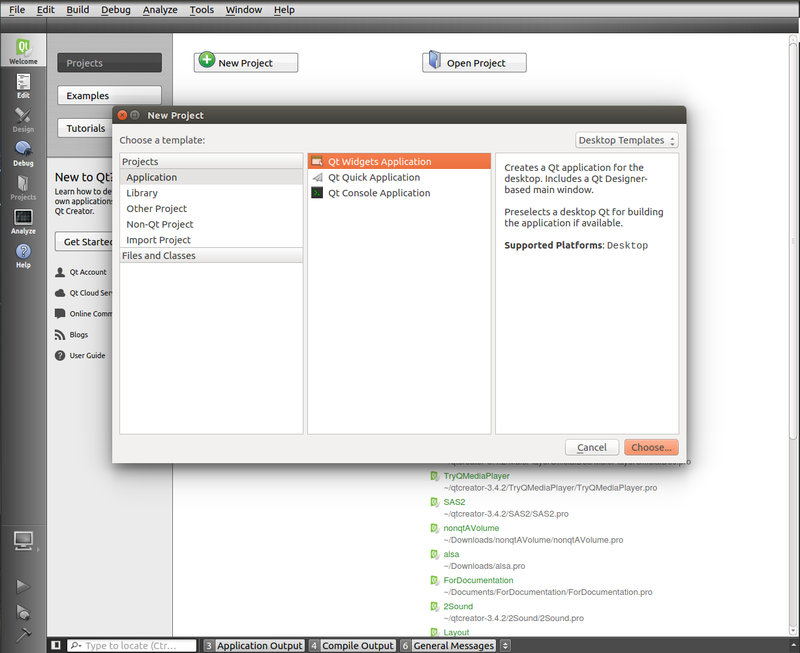
* A new window will pop up to specify the type of project you will be coding for. Select '''Application''' under the Projects column. | * A new window will pop up to specify the type of project you will be coding for. Select '''Application''' under the Projects column. | ||
| − | * Select '''Qt Widgets Application'''. <br /> [ | + | * Select '''Qt Widgets Application'''. <br /> <br /> |
| + | [[File:SelectQtWidgetApplication.png|800px]] | ||
| + | <br /><br /> | ||
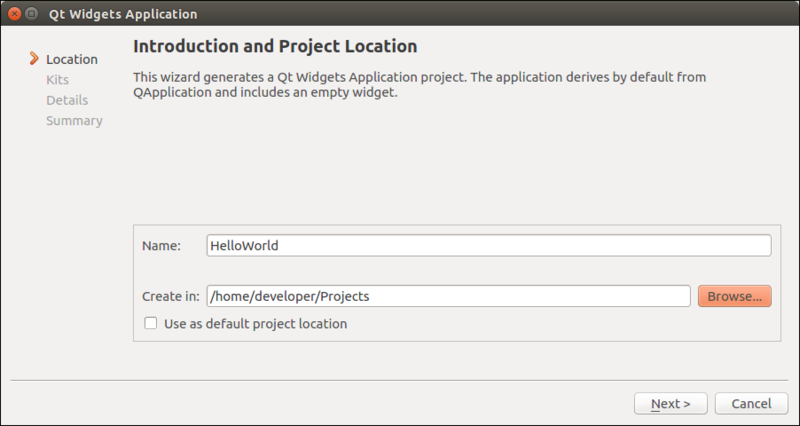
| − | * Click '''Choose'''. You'll be brought to another page requesting you to give the project a name and choose the location of the project. <br > [ | + | * Click '''Choose'''. You'll be brought to another page requesting you to give the project a name and choose the location of the project. <br ><br /> [[File:QtAppName_Location.png| 800px]] |
| + | <br /><br /> | ||
* Once you've given your project a name and have determined the path to store the project, click '''Next'''. | * Once you've given your project a name and have determined the path to store the project, click '''Next'''. | ||
| − | * Select the kit required for the device(s) on which you wish to run the application. In this example, all kits are selected, | + | * Select the kit required for the device(s) on which you wish to run the application. In this example, all kits are selected, but this project will be deployed to an OE 5.0 ARM device. Click '''Next'''. <br /> <br /> |
| + | [[File:QtKitSelection.png|800px]] | ||
| + | <br /><br /> | ||
| − | * Give the class a name and leave the base class as '''QMainWindow'''. The header, source, and form files will have the same name as the class name, but different extensions. These files may be modified if desired. Click '''Next''' to continue to the project summary.<br /> [ | + | * Give the class a name and leave the base class as '''QMainWindow'''. The header, source, and form files will have the same name as the class name, but different extensions. These files may be modified if desired. Click '''Next''' to continue to the project summary.<br /> <br />[[File:ClassInfo.png|800px]] |
| + | <br /><br /> | ||
* In the summary window, click '''Finish''' to be begin developing the project. | * In the summary window, click '''Finish''' to be begin developing the project. | ||
| Line 50: | Line 60: | ||
| − | For this example application, Qt will open <code>helloworld.cpp</code> in the editor. This is where the functionality of the application is implemented. Within <code>main.cpp</code>, a new object of the class will be created and launched. Almost all of the C++ code will be written in the class definition. The class definition is also capable of creating an managing UI elements, such as a push button. This example is designed to provide a quick start and won't demonstrate management of UI elements. More information on management of UI elements can be found at http://doc.qt.io/qtcreator/creator-using-qt-designer.html. | + | For this example application, Qt will open <code>helloworld.cpp</code> in the editor. This is where the functionality of the application is implemented. Within <code>main.cpp</code>, a new object of the class will be created and launched. Almost all of the C++ code will be written in the class definition. The class definition is also capable of creating an managing UI elements, such as a push button. This example is designed to provide a quick start and won't demonstrate management of UI elements. More information on management of UI elements can be found at http://doc.qt.io/qtcreator/creator-using-qt-designer.html. |
===Modify deployment configurations=== | ===Modify deployment configurations=== | ||
| − | Before developing the project, you will need to make some modifications to allow | + | Before developing the project, you will need to make some modifications to allow the project to be displayed and run on the desired device. |
<cl>1. Start by double clicking on <code>HelloWorld.pro</code>. | <cl>1. Start by double clicking on <code>HelloWorld.pro</code>. | ||
| − | * Add the lines "<code>target.path = /tmp</code>" and "<code>INSTALLS += target</code>" at the bottom of the file. This will set the location of the object file of the project to the "<code>/tmp</code>" directory. The full path to the project will be "<code>/tmp/HelloWorld</code>". <br />[ | + | * Add the lines "<code>target.path = /tmp</code>" and "<code>INSTALLS += target</code>" at the bottom of the file. This will set the location of the object file of the project to the "<code>/tmp</code>" directory. The full path to the project will be "<code>/tmp/HelloWorld</code>" on the target device. <br /><br /> |
| + | [[File:DotProPathConfig.png|800px]] | ||
| + | <br /><br /> | ||
* Use <code>'''Ctrl + S'''</code> to save the file. | * Use <code>'''Ctrl + S'''</code> to save the file. | ||
| − | * The run configurations can be modified in the '''Project''' tab at the left of the window. At the top of the '''Project''' page, click on '''Run''' under the desired kit. | + | * The run configurations can be modified in the '''Project''' tab at the left of the window. At the top of the '''Project''' page, click on '''Run''' under the desired kit. |
* Click on '''Details''' for '''Upload files via SFTP''' and make sure the '''Incremental deployment''' box is unchecked. | * Click on '''Details''' for '''Upload files via SFTP''' and make sure the '''Incremental deployment''' box is unchecked. | ||
| − | * | + | * The <code>'''-qws'''</code> argument is required under the '''Run''' configuration to run the application as a Qt server application. <br /> <br /> |
| + | [[File:QtProjectRunConfig.png|800px]] | ||
</cl> | </cl> | ||
| Line 73: | Line 86: | ||
<cl>1. Under the '''Tools''' drop down box, select '''Options'''. | <cl>1. Under the '''Tools''' drop down box, select '''Options'''. | ||
| − | * Select '''Devices''' from the scroll area to the left of the '''Options''' window. <br /> [ | + | * Select '''Devices''' from the scroll area to the left of the '''Options''' window. <br /><br /> |
| + | [[File:Options_devices.png|800px]] | ||
| + | <br /><br /> | ||
* Look to the top right of the window and click '''Add'''. | * Look to the top right of the window and click '''Add'''. | ||
| − | * You'll be brought to the '''Wizard Selection''' window to identify the type of device your target is. Select '''Generic Linux Device'''. <br /> [ | + | * You'll be brought to the '''Wizard Selection''' window to identify the type of device your target is. Select '''Generic Linux Device'''. <br /> <br /> |
| + | [[File:Generic_linux.png]] | ||
| + | <br /><br /> | ||
| − | * Click '''Start Wizard''' and set up the configuration for the device profile. Give the profile a name, set the device's IP Address, enter the username, and specify the authentication type. Provide a password if the authentication type requires it.<br /> [ | + | * Click '''Start Wizard''' and set up the configuration for the device profile. Give the profile a name, set the device's IP Address, enter the username, and specify the authentication type. Provide a password if the authentication type requires it.<br /><br /> |
| + | [[File:9G45NewDeviceConnection.png]] | ||
| + | <br /><br /> | ||
* Click '''Next''' when all the proper information of the device is provided. | * Click '''Next''' when all the proper information of the device is provided. | ||
| − | * At the summary window, click '''Finish''' and a connection be tween the target device and the developer's desktop will be tested. <br /> [ | + | * At the summary window, click '''Finish''' and a connection be tween the target device and the developer's desktop will be tested. <br /><br /> [[File:Device_test.png]]. |
| − | + | <br /><br /> | |
| − | |||
| + | * When the test has completed successfully, click '''Close'''. | ||
* Click '''Apply''' in the '''Options''' window to save the profile. | * Click '''Apply''' in the '''Options''' window to save the profile. | ||
| − | + | * Click on the '''Build & Run''' section from the list box. Go to the '''Kits''' tab and click on the kit for the device. Under the '''Devices''' drop down menu, select the device profile that was just created. <br /><br /> | |
| − | * Click on the '''Build & Run''' section from the list box. Go to the '''Kits''' tab and click on the kit for the device. Under the '''Devices''' drop down menu, select the device profile that was just created. <br /> [ | + | [[File:SelectDeviceToRun.png|800px]] |
| + | <br /><br /> | ||
* Save the device profile by clicking '''Apply'''. The profile has been completed and the options can be closed by clicking '''Ok''' at the bottom right of the window. | * Save the device profile by clicking '''Apply'''. The profile has been completed and the options can be closed by clicking '''Ok''' at the bottom right of the window. | ||
| + | </cl> | ||
| − | </ | + | <!-- /*********************************************************************************************************/ --> |
| + | <!-- /***************************************** Examples *****************************************/ --> | ||
| + | <!-- /*********************************************************************************************************/ --> | ||
| + | {{:Templateimpl:examples | initials=JJ | title=Creating the Project | desc=Creating a New EMAC OE SDK Project with qmake in Qt Creator | project=OE 5.0 }} | ||
| − | ===Coding Hello World=== | + | ===Coding Hello World and Designing the User Interface=== |
Qt Creator is now able to deploy the project to the target device. The application definition needs to be completed. | Qt Creator is now able to deploy the project to the target device. The application definition needs to be completed. | ||
| Line 102: | Line 126: | ||
* In the constructor, use the <code>qDebug()</code> function to print the string "<code>Hello World</code>". | * In the constructor, use the <code>qDebug()</code> function to print the string "<code>Hello World</code>". | ||
| − | * In the destructor, use the <code>qDebug()</code> function to print the string "<code>Goodbye World</code>". < | + | * In the destructor, use the <code>qDebug()</code> function to print the string "<code>Goodbye World</code>". |
| + | Here's what your <code>helloworld.cpp</code> should look like: | ||
| + | <syntaxhighlight lang="cpp-qt"> | ||
| + | #include "helloworld.h" | ||
| + | #include "ui_helloworld.h" | ||
| + | |||
| + | HelloWorld::HelloWorld(QWidget *parent) : | ||
| + | QMainWindow(parent), | ||
| + | ui(new Ui::HelloWorld) | ||
| + | { | ||
| + | ui->setupUi(this); | ||
| + | qDebug("Hello World"); | ||
| + | } | ||
| + | |||
| + | HelloWorld::~HelloWorld() | ||
| + | { | ||
| + | qDebug("Goodbye World"); | ||
| + | delete ui; | ||
| + | } | ||
| + | </syntaxhighlight> | ||
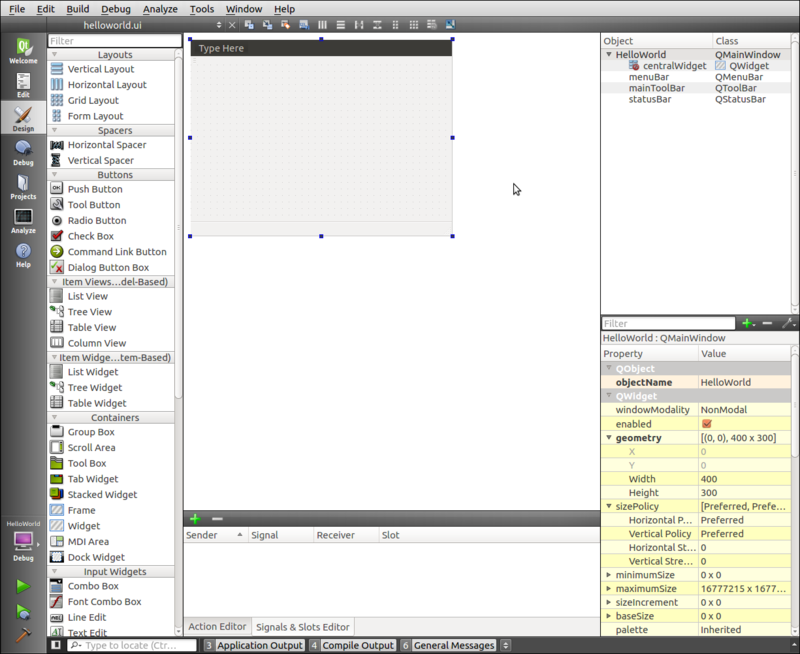
| − | * Double click <code>helloworld.ui</code> under the '''Forms''' folder in the '''Edit''' tabe to the left of the screen. This displays an interface that will allow objects to be dragged on to the UI of the application. <br /> [ | + | * Double click <code>helloworld.ui</code> under the '''Forms''' folder in the '''Edit''' tabe to the left of the screen. This displays an interface that will allow objects to be dragged on to the UI of the application. <br /><br /> |
| + | [[File:QtUIDesign.png|800px]] | ||
| + | <br /><br /> | ||
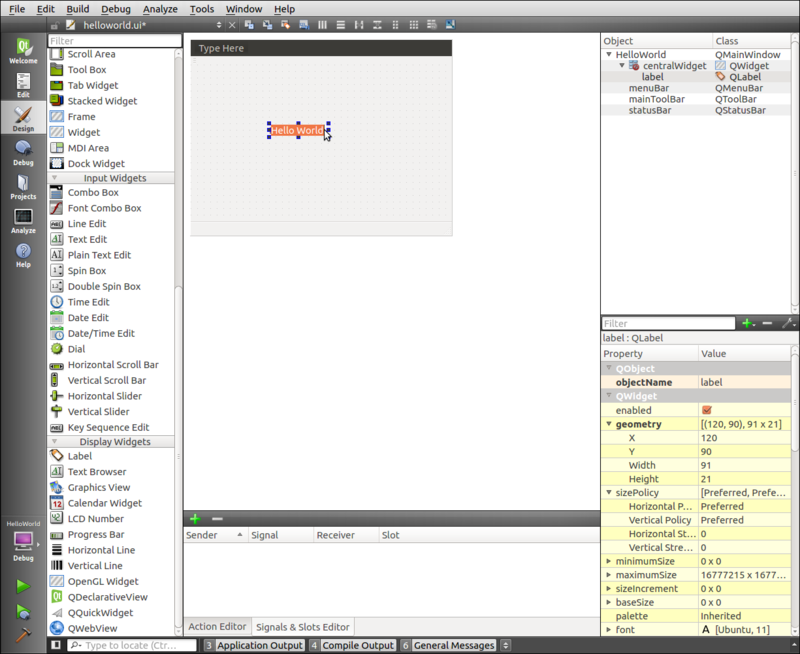
* Drag and drop a label to the UI. | * Drag and drop a label to the UI. | ||
| − | * Double click on the label to change the text to "<code>Hello World</code>". You may need to resize the label so the text can be seen. <br /> [ | + | * Double click on the label to change the text to "<code>Hello World</code>". You may need to resize the label so the text can be seen. <br /><br /> [[File:HelloUI.png|800px]] |
</cl> | </cl> | ||
| Line 114: | Line 159: | ||
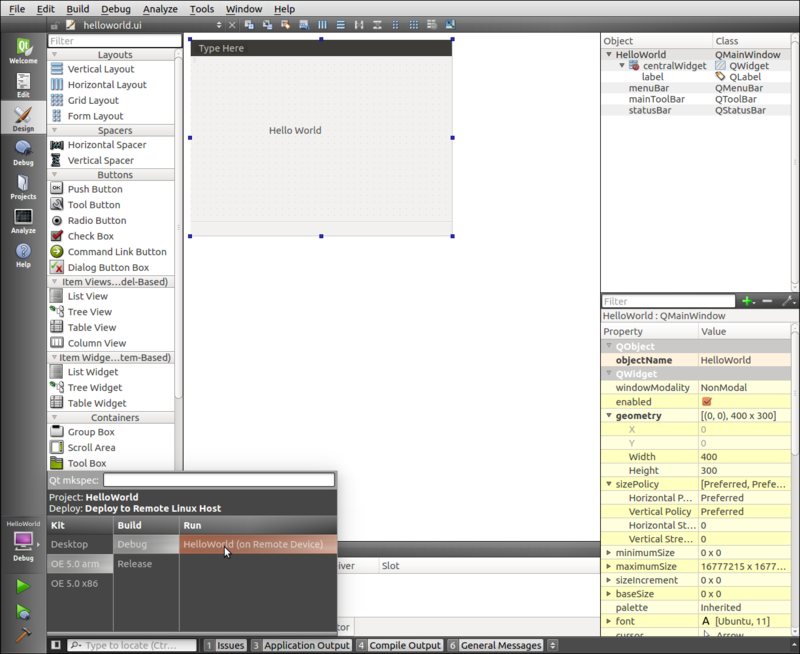
<cl>1. Click on the icon of a monitor at the bottom left of the window. | <cl>1. Click on the icon of a monitor at the bottom left of the window. | ||
| − | * Select the proper kit for your device, '''Build->Debug''', and the project name under '''Run'''. <br /> [ | + | * Select the proper kit for your device, '''Build->Debug''', and the project name under '''Run'''. <br /><br /> |
| + | [[File:BuildDebugRun.png| 800px]] | ||
| + | <br /><br /> | ||
| + | |||
| + | * Build the project by clicking the hammer icon at the bottom left of the window. A little window will momentarily pop up at the bottom right of the screen. The project has been successfully built if the green progress bar is full and now error messages have appeared. | ||
| − | + | {{note| If the build command complains of missing or unknown modules, a Qt version mismatch is likely the reason. Sometimes, the host PC and the EMAC target board will use different versions of Qt. Generally, this doesn't cause any problems, but occasionally, some Qt modules have been deprecated in the newer versions.}} | |
| − | |||
| − | * Once the project has successfully built, the project may be run. Click the green triangle icon at the bottom left of the window, below the monitor icon. <br /> [ | + | * Once the project has successfully built, the project may be run. Click the green triangle icon at the bottom left of the window, below the monitor icon. <br /><br /> |
| + | [[File:HelloWorldRun.png| 800px]] | ||
| + | <br /><br /> | ||
</cl> | </cl> | ||
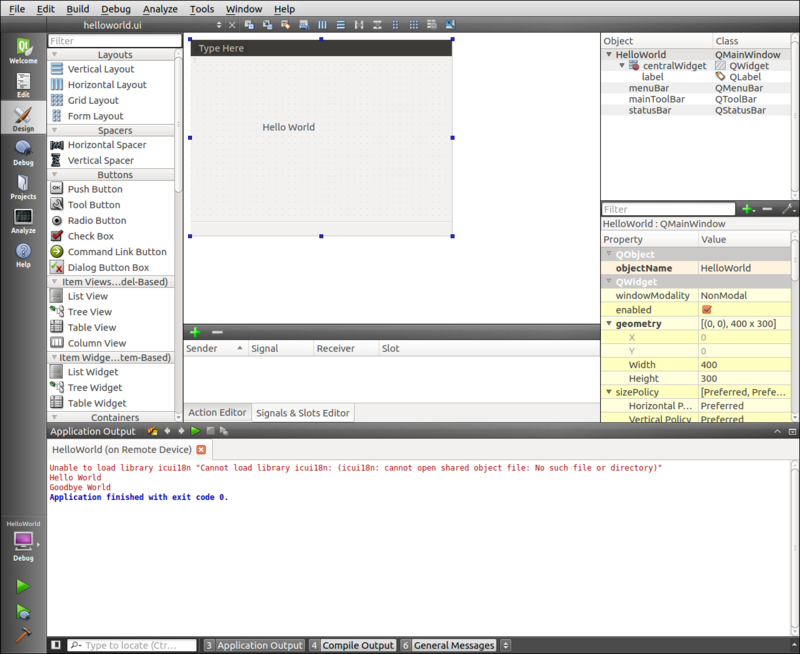
The Application Output terminal will pop up and display any error messages, the termination message, and any string output by <code>qDebug()</code>. | The Application Output terminal will pop up and display any error messages, the termination message, and any string output by <code>qDebug()</code>. | ||
| − | |||
| − | |||
| − | |||
| − | |||
| − | |||
<!-- /*********************************************************************************************************/ --> | <!-- /*********************************************************************************************************/ --> | ||
| Line 133: | Line 178: | ||
<!-- /*********************************************************************************************************/ --> | <!-- /*********************************************************************************************************/ --> | ||
{{:Templateimpl:conclusion | initials=JJ | title=Creating the Project | desc=Creating a New EMAC OE SDK Project with qmake in Qt Creator | project=OE 5.0 }} | {{:Templateimpl:conclusion | initials=JJ | title=Creating the Project | desc=Creating a New EMAC OE SDK Project with qmake in Qt Creator | project=OE 5.0 }} | ||
| − | Although very similar to [[Getting_Started_With_Qt_Creator | Getting Started with Qt Creator]], this guide | + | Although very similar to [[Getting_Started_With_Qt_Creator | Getting Started with Qt Creator]], this guide differs by introducing the reader to the process of developing a Qt application with a graphical user interface using Qt's qmake build system. Developing a new application generally follows these steps: create a new project, configure a new device profile if needed, modify the build and run conditions to allow deployment on the remote device, drag and drop the visual elements to the GUI using the UI designer, write the code needed to respond to interactions with the UI, build the application, and run the application upon a successful build. |
| + | More information about running Qt applications on EMAC systems (Open Embedded Linux modules) can be found at http://doc.qt.io/qt-4.8/qt-embedded-running.html. While the UI designer is a great way to visually plan out how the GUI will turn out, the entire application may be coded within the project C++ class file, including the UI elements. Qt provides a couple of example applications with a GUI for Linux Embedded systems coded in such a way. These example can be viewed at http://doc.qt.io/qt-4.8/examples-embeddedlinux.html. A larger set of Qt example applications can be found at http://doc.qt.io/qt-4.8/all-examples.html; not all of these examples will work for Embedded Linux or the EMAC OE SDK. Qt pre-compiled examples and source code can also be found on EMAC systems with Qt in <code>/usr/bin/qtopia</code> and in the EMAC OE SDK in <code>/opt/emac/5.0/sysroots/target_arch/usr/bin/qtopia </code>. These examples are applicable to Qt version 4.8 which is the newest version supported by EMAC OE 5.X. | ||
<!-- /*********************************************************************************************************/ --> | <!-- /*********************************************************************************************************/ --> | ||
<!-- /****************************************** More Information *****************************************/ --> | <!-- /****************************************** More Information *****************************************/ --> | ||
<!-- /*********************************************************************************************************/ --> | <!-- /*********************************************************************************************************/ --> | ||
| − | {{:Templateimpl:moreinfo | initials=JJ | title=Creating the Project | desc=Creating a New EMAC OE SDK Project with qmake in Qt Creator | project=OE 5.0 }} | + | <!-- {{:Templateimpl:moreinfo | initials=JJ | title=Creating the Project | desc=Creating a New EMAC OE SDK Project with qmake in Qt Creator | project=OE 5.0 }} |
| − | * | + | * --> |
{{:Templateimpl:whatnext | initials=JJ | title=Creating the Project | desc=Creating a New EMAC OE SDK Project with qmake in Qt Creator | project=OE 5.0 }} | {{:Templateimpl:whatnext | initials=JJ | title=Creating the Project | desc=Creating a New EMAC OE SDK Project with qmake in Qt Creator | project=OE 5.0 }} | ||
| − | * | + | * [[Getting_Started_With_Qt_Creator | Getting Started With Qt Creator]] |
| + | * [[Getting_Started_with_the_EMAC_OE_SDK| Getting Started with the EMAC OE SDK]] | ||
Latest revision as of 11:03, 8 June 2016
Alongside the EMAC OE 5.X SDK, EMAC provides the Qt Creator IDE(Interactive Development Environment). A great feature of this IDE is its UI design tool that will allow developers to produce applications with a GUI for EMAC devices equipped with LCD displays. The UI is constructed by dragging and dropping objects to the application UI. Using slots and signals, developers can easily program a functional, interactive, and visually pleasing interface. These project requires Qt Creator's tool qmake to build these applications.
Contents
Background
The user interface (UI) designer tool in Qt Creator can be used to develop applications reliant on a UI. Written in C++, these applications built using the EMAC OE SDK and the qmake tool can be deployed to EMAC carriers equipped with touch screen displays. Developers will be able to create software that is much more interactive with the user. For more information about Qt Creator, go to the Qt Creator Guidance page.
General Information
This page will present a guide to create a basic application using Qt Creator. You'll not only write the source code, but also design a UI for the application. Once that is done, you'll compile the project and deploy it to run on a remote target machine. A "Hello World" project is used as an example to demonstrate how to use the UI designer and receive output from the IDE.
Creating the Project
-
Launch the EMAC Qt Creator.
-
Click on "New Project".
-
A new window will pop up to specify the type of project you will be coding for. Select Application under the Projects column.
-
Select Qt Widgets Application.
-
Click Choose. You'll be brought to another page requesting you to give the project a name and choose the location of the project.
-
Once you've given your project a name and have determined the path to store the project, click Next.
-
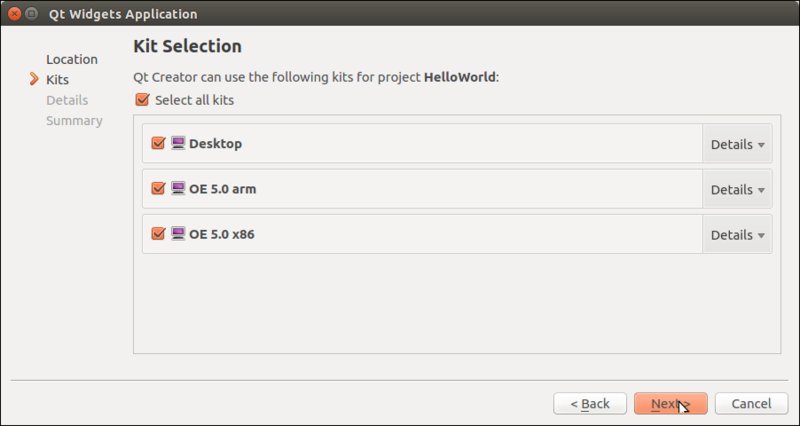
Select the kit required for the device(s) on which you wish to run the application. In this example, all kits are selected, but this project will be deployed to an OE 5.0 ARM device. Click Next.
-
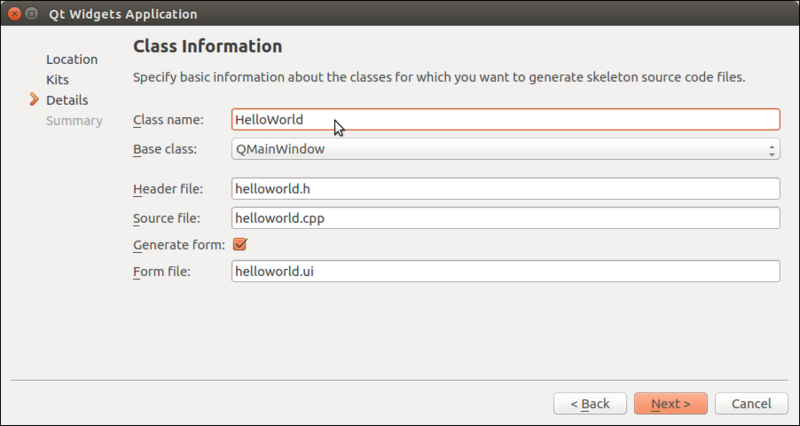
Give the class a name and leave the base class as QMainWindow. The header, source, and form files will have the same name as the class name, but different extensions. These files may be modified if desired. Click Next to continue to the project summary.
-
In the summary window, click Finish to be begin developing the project.


For this example application, Qt will open helloworld.cpp in the editor. This is where the functionality of the application is implemented. Within main.cpp, a new object of the class will be created and launched. Almost all of the C++ code will be written in the class definition. The class definition is also capable of creating an managing UI elements, such as a push button. This example is designed to provide a quick start and won't demonstrate management of UI elements. More information on management of UI elements can be found at http://doc.qt.io/qtcreator/creator-using-qt-designer.html.
Modify deployment configurations
Before developing the project, you will need to make some modifications to allow the project to be displayed and run on the desired device.
-
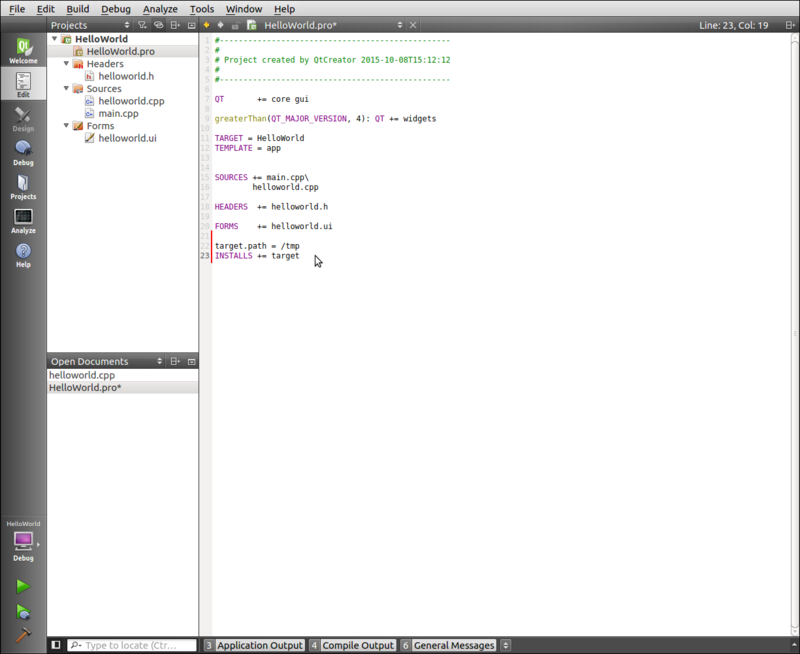
Start by double clicking on
HelloWorld.pro. -
Add the lines "
target.path = /tmp" and "INSTALLS += target" at the bottom of the file. This will set the location of the object file of the project to the "/tmp" directory. The full path to the project will be "/tmp/HelloWorld" on the target device.
-
Use
Ctrl + Sto save the file. -
The run configurations can be modified in the Project tab at the left of the window. At the top of the Project page, click on Run under the desired kit.
-
Click on Details for Upload files via SFTP and make sure the Incremental deployment box is unchecked.
-
The
-qwsargument is required under the Run configuration to run the application as a Qt server application.


Create a Device Profile
A profile will need to be created for your device in order for Qt Creator to deploy the application to it.
-
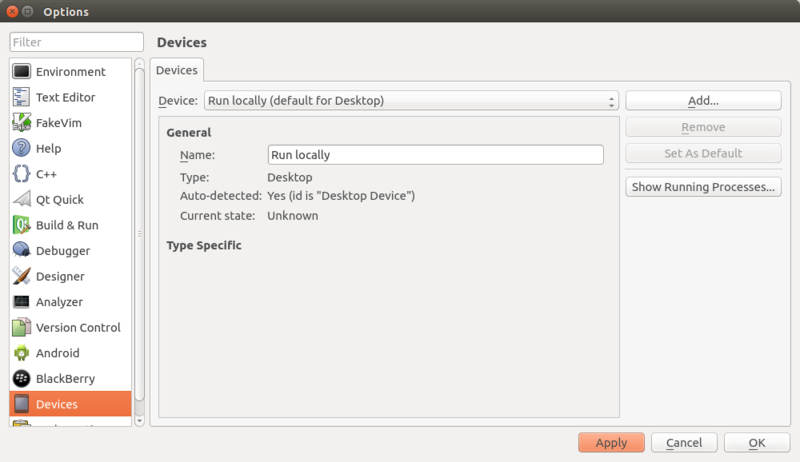
Under the Tools drop down box, select Options.
-
Select Devices from the scroll area to the left of the Options window.
-
Look to the top right of the window and click Add.
-
You'll be brought to the Wizard Selection window to identify the type of device your target is. Select Generic Linux Device.
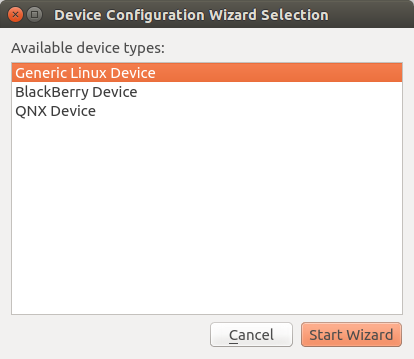
-
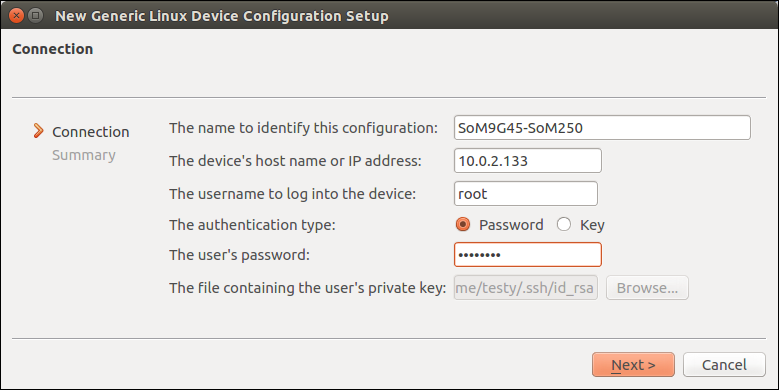
Click Start Wizard and set up the configuration for the device profile. Give the profile a name, set the device's IP Address, enter the username, and specify the authentication type. Provide a password if the authentication type requires it.
-
Click Next when all the proper information of the device is provided.
-
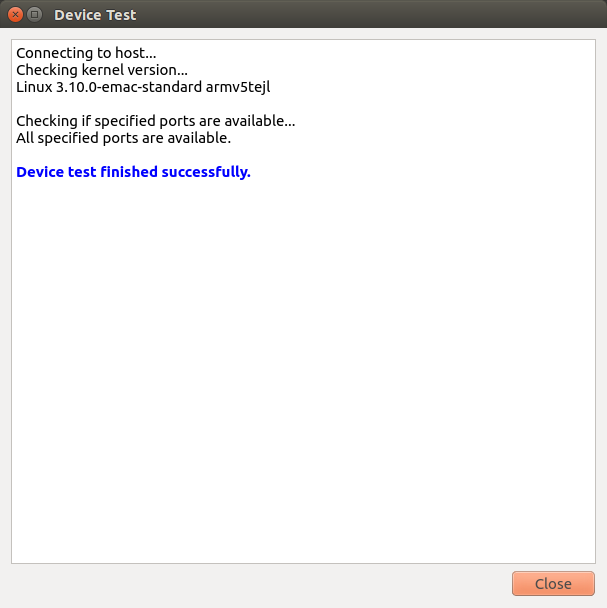
At the summary window, click Finish and a connection be tween the target device and the developer's desktop will be tested.
 .
.
-
When the test has completed successfully, click Close.
-
Click Apply in the Options window to save the profile.
-
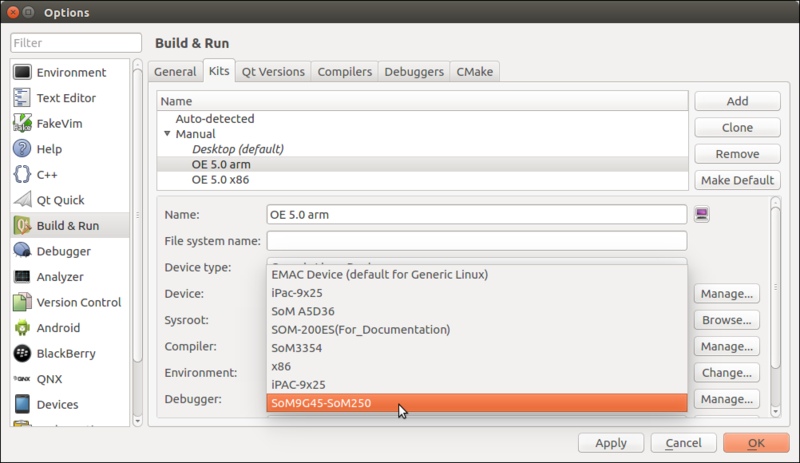
Click on the Build & Run section from the list box. Go to the Kits tab and click on the kit for the device. Under the Devices drop down menu, select the device profile that was just created.
-
Save the device profile by clicking Apply. The profile has been completed and the options can be closed by clicking Ok at the bottom right of the window.


Examples
Coding Hello World and Designing the User Interface
Qt Creator is now able to deploy the project to the target device. The application definition needs to be completed.
-
Double click the class
cppfile in the Edit tab. -
In the constructor, use the
qDebug()function to print the string "Hello World". -
In the destructor, use the
qDebug()function to print the string "Goodbye World". Here's what yourhelloworld.cppshould look like:#include "helloworld.h" #include "ui_helloworld.h" HelloWorld::HelloWorld(QWidget *parent) : QMainWindow(parent), ui(new Ui::HelloWorld) { ui->setupUi(this); qDebug("Hello World"); } HelloWorld::~HelloWorld() { qDebug("Goodbye World"); delete ui; }
-
Double click
helloworld.uiunder the Forms folder in the Edit tabe to the left of the screen. This displays an interface that will allow objects to be dragged on to the UI of the application.
-
Drag and drop a label to the UI.
-
Double click on the label to change the text to "
Hello World". You may need to resize the label so the text can be seen.


Building and Running the Project
-
Click on the icon of a monitor at the bottom left of the window.
-
Select the proper kit for your device, Build->Debug, and the project name under Run.
-
Build the project by clicking the hammer icon at the bottom left of the window. A little window will momentarily pop up at the bottom right of the screen. The project has been successfully built if the green progress bar is full and now error messages have appeared.
NOTE If the build command complains of missing or unknown modules, a Qt version mismatch is likely the reason. Sometimes, the host PC and the EMAC target board will use different versions of Qt. Generally, this doesn't cause any problems, but occasionally, some Qt modules have been deprecated in the newer versions.
-
Once the project has successfully built, the project may be run. Click the green triangle icon at the bottom left of the window, below the monitor icon.


The Application Output terminal will pop up and display any error messages, the termination message, and any string output by qDebug().
Conclusion
Although very similar to Getting Started with Qt Creator, this guide differs by introducing the reader to the process of developing a Qt application with a graphical user interface using Qt's qmake build system. Developing a new application generally follows these steps: create a new project, configure a new device profile if needed, modify the build and run conditions to allow deployment on the remote device, drag and drop the visual elements to the GUI using the UI designer, write the code needed to respond to interactions with the UI, build the application, and run the application upon a successful build.
More information about running Qt applications on EMAC systems (Open Embedded Linux modules) can be found at http://doc.qt.io/qt-4.8/qt-embedded-running.html. While the UI designer is a great way to visually plan out how the GUI will turn out, the entire application may be coded within the project C++ class file, including the UI elements. Qt provides a couple of example applications with a GUI for Linux Embedded systems coded in such a way. These example can be viewed at http://doc.qt.io/qt-4.8/examples-embeddedlinux.html. A larger set of Qt example applications can be found at http://doc.qt.io/qt-4.8/all-examples.html; not all of these examples will work for Embedded Linux or the EMAC OE SDK. Qt pre-compiled examples and source code can also be found on EMAC systems with Qt in /usr/bin/qtopia and in the EMAC OE SDK in /opt/emac/5.0/sysroots/target_arch/usr/bin/qtopia . These examples are applicable to Qt version 4.8 which is the newest version supported by EMAC OE 5.X.