Difference between revisions of "CutiPy-Installing MicroPython Firmware"
| Line 198: | Line 198: | ||
{{:Templateimpl:using | initials=BS | title=After Installation | desc=Basic tutorial for using the EMAC OE SDK. | project=OE 5.0 }} | {{:Templateimpl:using | initials=BS | title=After Installation | desc=Basic tutorial for using the EMAC OE SDK. | project=OE 5.0 }} | ||
| − | After installation of the firmware you can open a micropython REPL(read evaluate print loop) console (covered [http://wiki.emacinc.com/wiki/Cutipy_Getting_Started | + | After installation of the firmware you can open a micropython REPL(read evaluate print loop) console (covered [http://wiki.emacinc.com/wiki/Cutipy_Getting_Started here ]), and verify the firmware version by entering the following into the REPL console |
{{clo}} | {{clo}} | ||
Revision as of 11:35, 4 September 2019
Contents
THIS PAGE IS CURRENTLY UNDER CONSTRUCTION
Necessary equipment
-
CutiPy
-
1 Micro-USB cable
-
A pair of needle nose pliers for wire jumper re-positioning
-
A personal computer (Windows or Linux)
-
EMAC's latest MicroPython firmware release
Windows Users
-
With the USB disconnected and power removed, carefully use a pair of needle nose pliers to shift jumper JB2 upwards from FLS to to RXM (The BT0 and RXM pins will now be linked).
-
Connect your CutiPy to your PC using the Micro-USB cable.
-
Download and install Zadig
-
Open Zadig and select STM32 BOOTLOADER and WinUSB
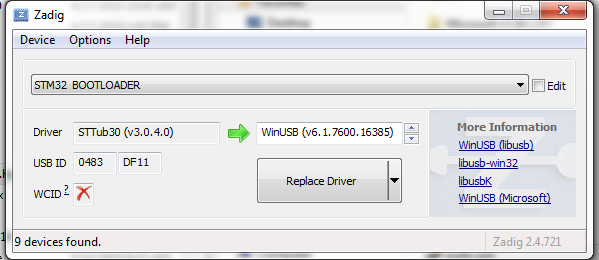
NOTE The STM32 BOOTLOADER option is only available when the microUSB is connected.
-
Click Replace Driver
NOTE Upon clicking “Replace Driver” the app may read “Not Responding” for a short duration and then recover. This is normal.
-
After successfully installing the WinUSB driver, download the latest dfu-util application zip file here.
-
Extract the zip file.
-
For convenience, save the CutiPy firmware dfu file to the dfu-util folder.
-
Open the Windows Command Prompt by searching and selecting "Command Prompt" from the Windows start menu.
-
From the Command Prompt navigate to the dfu-util directory. If necessary switch drives by entering 'drive_name:. For example to switch to the C drive enter c:. Use dir to list sub-directories and use cd directory_name to navigate to a subdirectory.
Microsof Windows [Version 6.1.7601]
Copyright (c) 2009 Microsoft Corporation. All rights reserved.O:\>C:
C:\Users>cd MyUser
C:\Users\MyUser>cd Desktop
C:\Users\MyUser\Desktop>cd dfu-util-0.9-win64
C:\Users\MyUser\Desktop\dfu-util-0.9-win64>
-
Once in the dfu-util directory enter dfu-util -l. Something similar to the following should be displayed:
C:\Users\MyUser\Desktop\dfu-util-0.9-win64>dfu-util -l
Copyright 2005-2009 Weston Schmidt, Harald Welte and OpenMoko Inc. Copyright 2010-2016 Tormod Volden and Stefan Schmidt This program is Free Softwasre and has ABSOLUTELY NO WARRANTY Please report bugs to http: // sourceforge.net / p / dfu-util / tickets /
Found DFU: [0483:df11] ver 2200, dvenum=7, cfg =1, intf=0, path="2-1.3", alt=3, n
ame="@Device Feature/0xFFFF0000/01*004 e", serial="336445653437"
Found DFU: [0483:df11] ver 2200, dvenum=7, cfg =1, intf=0, path="2-1.3", alt=2, n
ame ="@OTP Memory /0x1FFF7900/01*412 e, 01*016 e", serial="336445653437"
Found DFU: [0483:df11] ver 2200, dvenum=7, cfg =1, intf=0, path="2-1.3", alt=1, n
ame="@Option Bytes/0xFFFF0000/01*016 e", serial="336445653437"
Found DFU: [0483:df11] ver 2200, dvenum=7, cfg =1, intf=0, path="2-1.3", alt=0, n
ame="@Internal Flash /0x08000000/04*016Kg, 01*064Kg, 07*128Kg", serial="336445653
437"
C:\Users\MyUser\Desktop\dfu-util-0.9-win64>
-
From this directory install the firmware to the device by entering the following into the Command Prompt, where firmware.dfu is just the name of the firmware dfu file:
C:\Users\MyUser\Desktop\dfu-util-0.9-win64>duf-util --alt 0 -D firmware.dfu
NOTE If the firmware dfu is save anywhere other than the dfu-util folder, the full path location will need to be entered. E.g. dfu-util --alt 0 -D ...\firmware.dfu, where "..." should be filled in with the directory path.
Something similar to the following should be displayed.C:\Users\MyUser\Desktop\dfu-util-0.9-win64>duf-util --alt 0 -D firmware.dfu
Copyright 2005-2009 Weston Schmidt, Harald Welte and OpenMoko Inc.
Copyright 2010-2016 Tormod Volden and Stefan Schmidt
This program is Free Softwasre and has ABSOLUTELY NO WARRANTY
Please report bugs to http: // sourceforge.net / p / dfu-util / tickets /
Match vendor ID from file: 0483
Match product ID from file: df11
Opening DFU capable USB device...
ID 0483:df11
Run-time device DFU version 011a
Claiming USB DFU Interface...
Setting Alternate Setting #0 ...
Determining device status: state = dfuERROR, satus = 10
dfuERROR, clearing status
Determining device status: state = dfuIDLE, status = 0
dfuIDLE, continuing
DFU mode device DFU version 011a
Device returned tranfer size 2048
DfuSe interface name: "Internal Flash "
file contains 1 DFU images
parsing DFU image 1
image for alternate setting 0, <2 elements, total size = 386288>
parsing element1, address = 0x08000000, size =15000
Download [=========================] 100% 15000 bytes
Download done.
pasing element 2, address = 0x8020000, size =371272
Download [=========================] 100% 371272 bytes
Download done.
done parsing DfuSe file
C:\Users\MyUser\Desktop\dfu-util-0.9-win64>
The firmware is now installed.
-
Safely eject and disconnect the USB, shift the JB2 pin jumper back to the original location (BT0 and FLS should now be joined). Now reconnnect the MicroUSB cable.
Installation is now complete complete.

If desired, please enter a name for this project, otherwise press Enter to use the default: hello_emac
-- Creating new project directory...
-- Creating new source file...
-- Building custom CMakeLists.txt file...
-- Done.
Do you want to create a build directory for this project? (y/n) y
-- Creating build directory...
Do you want to run cmake for this project? (y/n) y
-- Using system compiler
-- The C compiler identification is GNU 4.8.2
-- The CXX compiler identification is GNU 4.8.2
-- Check for working C compiler: /usr/bin/cc
-- Check for working C compiler: /usr/bin/cc -- works
-- Detecting C compiler ABI info
-- Detecting C compiler ABI info - done
-- Check for working CXX compiler: /usr/bin/c++
-- Check for working CXX compiler: /usr/bin/c++ -- works
-- Detecting CXX compiler ABI info
-- Detecting CXX compiler ABI info - done
-- Configuring done
-- Generating done
-- Build files have been written to: /home/developer/projects/hello_emac/hello_emac-build
Do you want to compile this project? (y/n) y
Scanning dependencies of target hello_emac
[100%] Building C object CMakeFiles/hello_emac.dir/hello.c.o
Linking C executable hello_emac
[100%] Built target hello_emac
Linux Users
Follow the EMAC DFU instructions given here
After Installation
After installation of the firmware you can open a micropython REPL(read evaluate print loop) console (covered here ), and verify the firmware version by entering the following into the REPL console
>>> import os >>> os.uname()
Output should look similar to the following:
(sysname='pyboard', nodename='pyboard', rlease='0.0.1', version='394ae277 as IOT-F40
7C-XXXRX on 2019-06-07', machine = 'EMAC-CutiPy with STM32F407')
>>>