Example getkey
This procedure provides an overview of how to open, build and run the getkey C example project using the Eclipse IDE.
Contents
- 1 Opening, Building and Uploading the Project Files
- 2 Description, Usage and Expected Behavior
- 2.1 Necessary Hardware
- 2.2 Plugging the Keypad into the SOM-150ES Carrier Board
- 2.3 Using getkey
- 2.4 Usage Example. Associating the Specified Keypad Matrix File with the Specified Keypad Device Node
- 2.5 Usage Example. Displaying the Character Presently Associated With a Key on the Keypad
- 2.6 Usage Example. Displaying the Character Matrix Presently Associated with the Keypad
Opening, Building and Uploading the Project Files
1. Open the C/C++ editing perspective.
stub
2. Open the getkey project files.
stub
3. Build the getkey project.
stub
4. Upload the getkey binary to the target machine.
stub
Description, Usage and Expected Behavior
This is an example program for mapping keypad input to a character matrix using the keypad interface on the SOM-150ES.
Necessary Hardware
To use the getkey program you will need the following hardware.
- A SOM-150ES carrier board (Available from EMAC).
- A compatible SoM for that carrier board (SOM-9260M, SOM-9G20M and SOM-9X25 are all compatible and available from EMAC).
- A compatible keypad (Available from EMAC, refer to item# E20-21 or E020-25. Datasheet).
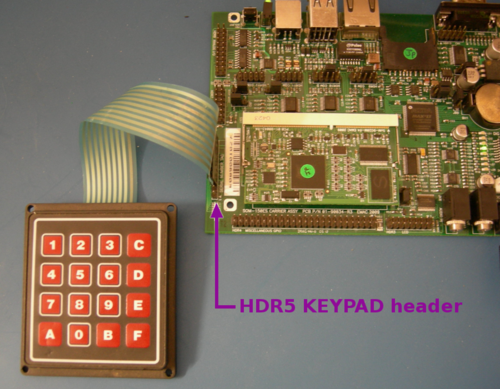
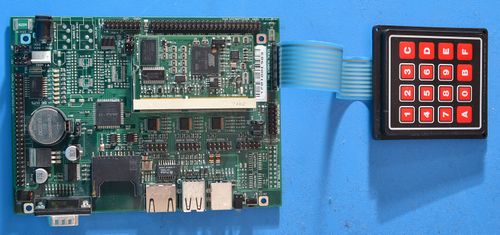
SOM-150ES carrier board with keypad
Plugging the Keypad into the SOM-150ES Carrier Board
Plug the keypad into the HDR5 KEYPAD header of the SOM-150ES Carrier Board.

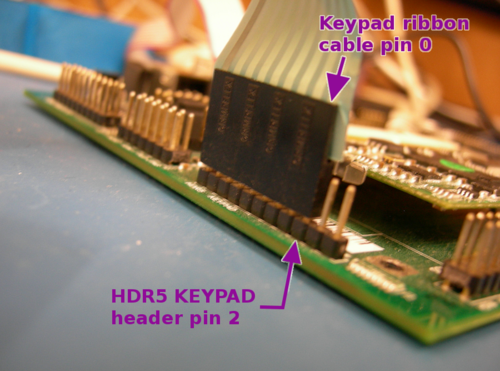
Make sure that you line up pin 0 of the keypad's ribbon cable with pin 2 of the header.

Using getkey
The getkey program is controlled from the console via command line parameters. It has 4 functions. You can specify the keypad device node, specify the keypad matrix file (see note on the keypad matrix file, below), output the current matrix to the console and test individual keys on the keypad.
./getkey [-d device -b -g -s file]
- d
- Specify the keypad device node. The default is
/dev/keypad - b
- Test an individual key-character assignment (via "read blocking"). The program will sleep until a key on the keypad is pressed, then output that key's character to the console.
- g
- Outputs the current keypad matrix (see note on the keypad matrix file, below) to the console.
- s
- Specify the keypad matrix file. (See note on the keypad matrix file, below). If a keypad matrix file is not specified then the character associated with the last keypad key pressed is returned.
Note on parameter order. Parameters are evaluated in order. If blocking (b) or device specifications (d) are used, they must be declared before the matrix arguments on the command line.
Note on the keypad matrix file. The keypad matrix file specifies which characters are associated with which keypad-keys. A sample matrix file is included with the project: Key-E020-21. This is a standard text file. The character assignments are arranged in a simple grid.
Usage Example. Associating the Specified Keypad Matrix File with the Specified Keypad Device Node
./getkey -d /dev/keypad0 -s /path/to/this/file/Key-E020-21
The program will map the keypad at /dev/keypad0 to the matrix file Key-E020-21. This associates the grid of characters in the matrix file (see Note on the keypad matrix file, above) with the grid of keys on the keypad.
Usage Example. Displaying the Character Presently Associated With a Key on the Keypad
./getkey -d /dev/keypad0 -b
The program will wait until a key is pressed on the keypad. When a key is pressed it will display the character associated with that pressed key, as specified in the keypad matrix file (see Note on the keypad matrix file, above).
For example:
root@som9g20:/tmp# ./getkey -d /dev/keypad0 -b
5
root@som9g20:/tmp#
In this case I pressed the 5 key on the keypad.
Usage Example. Displaying the Character Matrix Presently Associated with the Keypad
./getkey -d /dev/keypad0 -g
The program will display the character matrix (see Note on the keypad matrix file, above) presently associated with the keypad at /dev/keypad0.
root@som9g20:/tmp# ./getkey -d /dev/keypad0 -g
1 2 3 C
4 5 6 D
7 8 9 E
A 0 B F
root@som9g20:/tmp#
The character matrix displayed here is that of the Key-E020-21 file.
