Getting Started With Minicom
Contents
Background
minicom is a serial communication program that connects to devices through a GNU/Linux PC's serial ports. If run by calling its name without any additional arguments, it uses whatever settings have been saved for its defaults in /etc/minicom/minirc.dfl. For those using a Windows, PuTTY is a great application to make such connections between a Windows PC and one of our EMAC devices. More information about PuTTY can be found at http://wiki.emacinc.com/wiki/PuTTY.
General Information
The use of minicom is required when connecting to and EMAC board for testing purposes. This pages sets out to provide general information about using minicom as well as a guide to demonstrate using it to connect with EMAC devices.
Getting Started With Minicom
-
If
minicomhas yet to be installed on your development Linux machine, useapt-getto install theminicompackageuser@developerpc:~#sudo apt-get install minicom -
The
minicomsettings will need to be changed so that the application will be able to find your device. Pull up the settings using the-soption.user@developerpc:~#sudo minicom -s -
The first thing that will need to be configured is the Serial port setup. Arrow down to the title and press the Enter key.
[Screenshot?] -
To modify the different configurations, press the key corresponding to the setting. For example, press the 'A' key to modify the Serial Device. Press the 'Enter' key to save the parameters for the setting. The EMAC devices will require the Bps/Par/Bits, and flow control settings. Set Bps/Par/Bits to 115200 baud, 8 data bits and no priority. Set both flow control settings to 'No'.
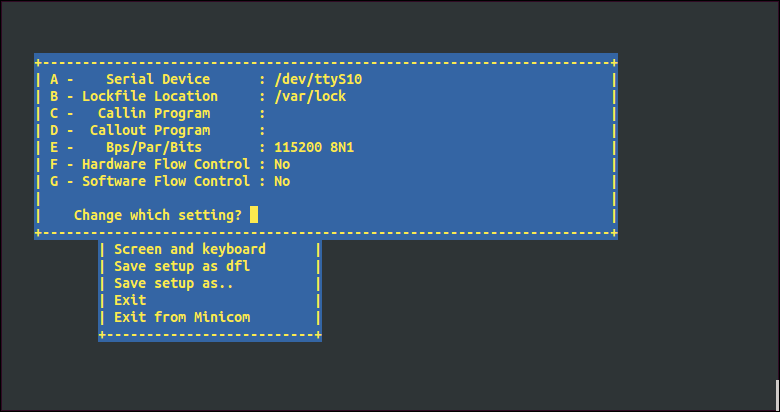
If you're likely to use the same serial port when connecting to your device with minicom, modify the Serial Device setting to have the path to the port. This way, you'll be able to run the command without any options or commands. Press the 'Esc' key to save the settings and to be be brought back to the configurations page
-
The next setting that needs to be configure is the Modem and dialing. Press the 'A" key and delete its content. Hit the 'Enter' key to save the setting as blank. Do this for B-K, and H. Hit the 'Esc' key when finished deleting the content of these settings. That's all the modifications that need to be done to get
minicomset up. Arrow down to Exit from Minicom and press 'Enter'.

Running Minicom
Now that everything is configured, let's make the connection to the device.
-
Run the
minicomcommand with the option-Dand the path to the device as an argument.user@developerpc:~#minicom -D /dev/ttyS10Using the
-ooption will allowminicomto make the connection more quickly by not sending AT commands to initialize a modem. -
Log in to the device as the root user