Getting Started With Minicom
Contents
Background
minicom is a serial communication program that connects to devices through a GNU/Linux PC's serial ports. If run by calling its name without any additional arguments, it uses whatever settings have been saved for its defaults in /etc/minicom/minirc.dfl. For those using Windows, PuTTY is a viable application to make such connections between a Windows PC and one of our EMAC devices. More information about PuTTY can be found at http://wiki.emacinc.com/wiki/PuTTY.
Please note that while PuTTY will work, it is missing a number of features relative to a real Linux terminal. In particular, a number of keystroke shortcuts will not work with PuTTY, and not all output will be displayed correctly in PuTTY (although it does manage to display most output correctly). For serious work with Linux, a real Linux terminal (such as minicom, described here) is strongly recommended.
General Information
The use of a terminal emulator, such as minicom, is required when connecting to an EMAC board via a serial console. This page sets out to provide general information about using minicom to communicate between EMAC machines and a development PC.
The following list of arguments can be used to alter minicom's behavior from the command line:
- -b <baudrate>
- The serial port baud rate used by the external device–typically a SOM.
- -D <device_name>
- The device name for the serial port being used.
- -h
- Show a list of arguments that minicom accepts.
For a more comprehensive list of options and their descriptions, read the manpage for minicom:
user@developerpc:~# man minicomThe calling convention for minicom is as follows:
minicom [OPTIONS] [configuration]
Where [OPTIONS] is a space-delimited list of options from among those listed above.
[configuration] is a configuration file that can be found in /etc/minicom/.
Note that most configurations are named minirc.<some_name> where <some_name> is what should be specified in place of [configuration] above.
Getting Started With Minicom
-
If
minicomhas yet to be installed on your Linux machine, useapt-getto install theminicompackageuser@developerpc:~#sudo apt-get install minicom -
The
minicomsettings will need to be changed so that the application will be able to find your device. Pull up the settings using the-soption.user@developerpc:~#sudo minicom -sThis should bring up a colorful display listing the different settings. If the display isn't colored, arrow down to Exit from Minicom. Run the
minicomcommand with the option-con. Thecspecifies the color display andontellsminicomto display the interface in color.minicomcan be made to always run in color by modifying the~/.bashrcfile, setting theMINICOMenvironment variable by adding the lines shown below, and restarting your terminal session (or sourcing your.bashrc) to make the change take effect:MINICOM='-con' export MINICOM
Another method to set
minicomto always display in color is to set an alias forminicomtominicom -con. However, doing this could lead to problems or confusion when trying to run minicom with other aliases or with a very specific set of commandline options, so the environment variable method should be used instead wherever possible.alias minicom='minicom -con'
-
The first thing that will need to be configured is the Serial port setup. Arrow down to the title and press the 'Enter' key.
-
To modify the different configurations, press the key corresponding to the setting. For example, press the 'A' key to modify the path to the Serial Device. Press the 'Enter' key to save the parameters for the setting. The settings for specific EMAC devices can be found at the Serial Connections page.
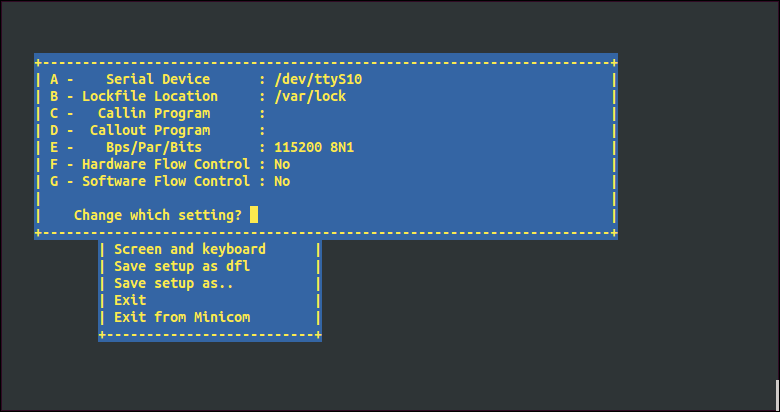
In this screenshot, the "115200 8N1" for the Bps/Par/Bits setting indicates the baud rate is set to 115200, data bits set to 8 (the '8' in 8N1), parity is set to none (the 'N' in 8N1), and stop bits is set to 1 (the '1' in 8N1). -
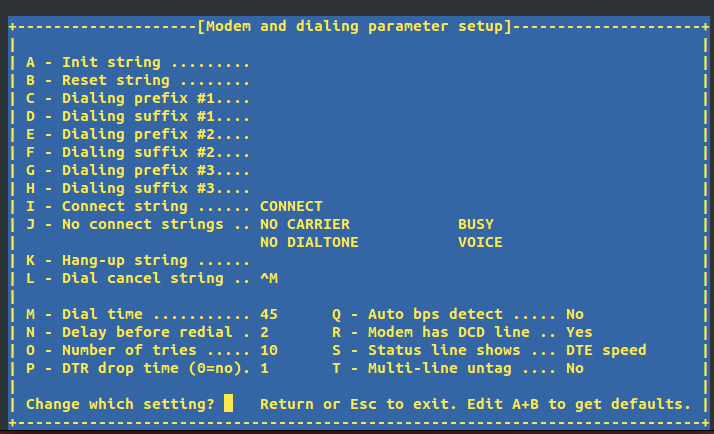
Press enter and scroll to Modem and dialing and press enter again. Clear out the Init string, Reset string, Dialing prefix #1, Dialing suffix #1, Dialing prefix #2, Dialing suffix #2, Dialing prefix #3, Dialing suffix #3 by pressing the corresponding letters [A-H] then deleting the string. The final result should look like:
-
You will most likely wish to modify the Serial Device setting to have the path to the serial port you normally use. This way, you'll be able to run the command without any options or commands. Press the 'Esc' key to be be brought back to the configurations page.
-
The next setting that needs to be configured is the Modem and dialing. Press the 'A' key and delete its content. Hit the 'Enter' key to set the setting as blank. Also do this for B through H and K. Hit the 'Esc' key when finished deleting the content of these settings.
-
That's all the modifications that need to be done to get
minicomset up. You'll need to save the configurations in one of two ways:- You may want to save the configuration as the default whenever
minicomis launched. Arrow down to Save setup as dfl and press 'Enter'.
- You may want to save the configuration as the default whenever
- You may also save the modifications as its own configuration. This is advantageous if you have many serial ports or if you have multiple systems with varying serial connection configurations. Arrow down to Save setup as.. and press 'Enter'. Name the configuration as something unique, like
ttyS11to identify that the path to the serial device is/dev/ttyS11. The new file created for your configuration will be/etc/minicom/mini.ttyS11. You may pass the configuration as an argument to use that configuration when launchingminicom:
- You may also save the modifications as its own configuration. This is advantageous if you have many serial ports or if you have multiple systems with varying serial connection configurations. Arrow down to Save setup as.. and press 'Enter'. Name the configuration as something unique, like
user@developerpc:~#minicom ttyS11
- If a "
cannot write to"message pops up, you likely aren't running the command as root. Re-run "minicom -s" withsudo.
-
Once you have saved the configuration, arrow down to Exit from Minicom.


Running Minicom
Now that everything is configured, you are ready to open the serial connection.
-
Run the
minicomcommand to startminicomwith the serial port setting you configured above. If you wish to useminicomon a different serial port, see the note below. -
Log in, if necessary, with the appropriate username and password for the device. Login information can be found here. You're now able to communicate to the device and use
minicomin the same way as using the terminal for the device.
| NOTE |
When opening a connection to a different serial port than what has been saved from the minicom configurations, use the -D option to specify the path to the desired serial port. For example, to use /dev/ttyUSB0, run minicom like this:
user@developerpc:~# minicom -D /dev/ttyUSB0 |
Conclusion
This program is a very important tool for developers. The serial console is essential for working with the bootloader on ARM systems, since U-Boot cannot be accessed via ssh. Using the serial console, you will be able to configure the bootloader, to program new kernels via the bootloader, to program new filesystems, to make a copy of the filesystem on a board, and to perform memory checks using U-Boot. The serial console will also enable you to see startup and shutdown messages, to configure and debug the system when networking is not configured or is not working, and to debug the system when the machine is not booting up.
Further Information
Where to Go Next