Difference between revisions of "First Time Starting Eclipse"
| (6 intermediate revisions by 5 users not shown) | |||
| Line 1: | Line 1: | ||
| − | {{todo|<strike>Polish this and mark it as OE 4</strike>(11.13.13-11:57->KY+);(11.14.13-18:35->MD+)|Michael Gloff|project=oe 4,mg,ky,md, | + | {{todo|SEOKWREV <strike>Polish this and mark it as OE 4</strike>(11.13.13-11:57->KY+);(11.14.13-18:35->MD+);(03.04.14-16:40->BS-);(03.24.14-15:10->BS+)|Michael Gloff|project=oe 4,mg,ky,md,bs,SEOKWREV}} |
| + | |||
| + | {{#seo: | ||
| + | |title=First Time Starting Eclipse | ||
| + | |titlemode=append | ||
| + | |keywords=Starting Eclipse,Eclipse Procedure,Eclipse Workspace,Eclipse GUI | ||
| + | |description=Familiarizes you with the basic steps involved in opening an instance of Eclipse. | ||
| + | }} | ||
| + | This guide is intended to follow the [[Installing Eclipse|installation]] of the Eclipse distribution. It will familiarize you with the basic steps involved in opening an instance of Eclipse and changing the layout of the Eclipse UI using Eclipse Perspectives. However, please note that this short tutorial is not intended as a comprehensive guide to Eclipse. Please see the official [http://www.eclipse.org/documentation/ Eclipse Documentation] for more information on Eclipse. | ||
| − | |||
| − | |||
== Procedure == | == Procedure == | ||
<cl> | <cl> | ||
| − | 1. To initiate the Eclipse GUI as shown in Figure 1 below, run the application with the following command | + | 1. To initiate the Eclipse GUI as shown in Figure 1 below, run the application with the following command. |
<syntaxhighlight lang=bash> | <syntaxhighlight lang=bash> | ||
| Line 38: | Line 44: | ||
It is recommended that you spend some time familiarizing yourself with the layout of the GUI; read the Eclipse documentation, explore the help contents, and try following some of the tutorials available through the welcome screen. Once you are comfortable with the Eclipse environment, continue by [[Using the Eclipse Terminal View|configuring the Eclipse terminal view]]. | It is recommended that you spend some time familiarizing yourself with the layout of the GUI; read the Eclipse documentation, explore the help contents, and try following some of the tutorials available through the welcome screen. Once you are comfortable with the Eclipse environment, continue by [[Using the Eclipse Terminal View|configuring the Eclipse terminal view]]. | ||
| − | [[Category: | + | <!--[[Category:Eclipse]]--> |
Latest revision as of 15:12, 24 March 2014
This guide is intended to follow the installation of the Eclipse distribution. It will familiarize you with the basic steps involved in opening an instance of Eclipse and changing the layout of the Eclipse UI using Eclipse Perspectives. However, please note that this short tutorial is not intended as a comprehensive guide to Eclipse. Please see the official Eclipse Documentation for more information on Eclipse.
Procedure
-
To initiate the Eclipse GUI as shown in Figure 1 below, run the application with the following command.
developer@ldc:~$ /install/directory/eclipse
-
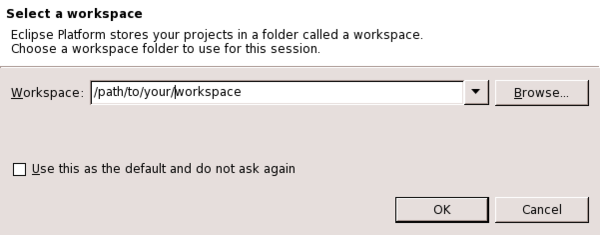
After a short delay, a dialog window will prompt the user for a workspace location as shown in Figure 2. The workspace is the folder to which Eclipse will look to when opening existing projects or creating new ones. Click OK.
-
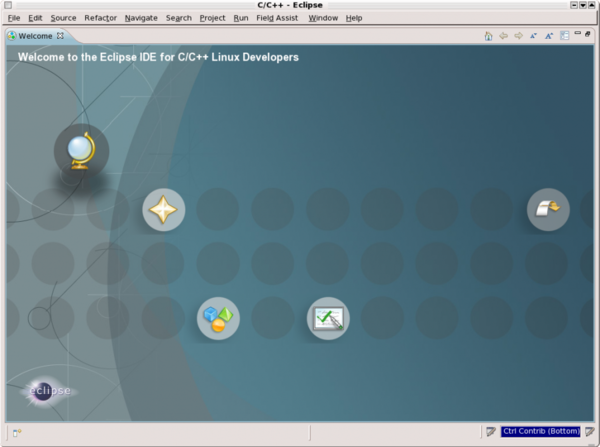
After choosing a workspace directory, the splash screen will eventually be replaced by the Eclipse welcome screen as shown in Figure 3. EMAC recommends exploring the links on this welcome screen as they contain valuable information about Eclipse. Note that if an existing workspace from a previous Eclipse installation is selected, the settings from that workspace will affect the way Eclipse operates once started. EMAC recommends that a new workspace is used for this guide to ensure that the screen shots provided here are valid. A new workspace is created by typing the new directory's absolute path into the dialog shown in Figure 2. For example, to create a workspace in the home directory named, "EMAC_workspace," type
/home/user_name/EMAC_workspace/.
-
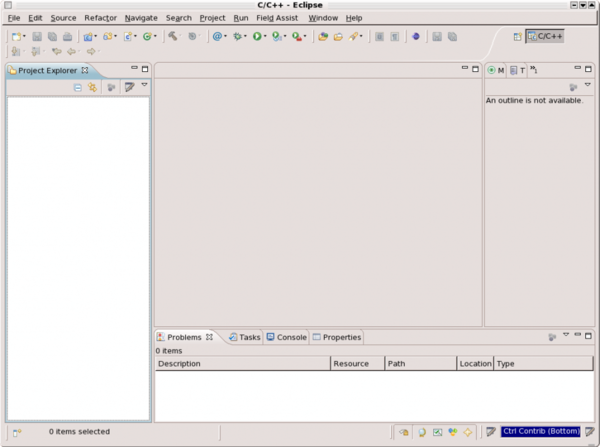
Next, click on the Workbench icon which is located in the upper right corner of the screen as shown in Figure 3. This brings up the default Eclipse perspective, shown in Figure 4.
-
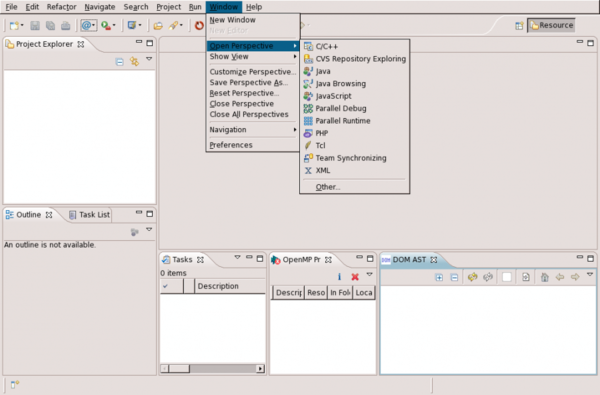
Initially, the Eclipse Workbench opens in the C/C++ Perspective. However, there may be times when a programming session leads to another perspective, such as the Resource Perspective. The C/C++ Perspective can be set from any other perspective by selecting the Window -> Open Perspectives from the Eclipse menu bar and choosing the C/C++ menu item as shown in Figure 5. Note that this demonstration uses the Resource Perspective. Each perspective has its own list of perspectives which is shown by default in the Window -> Open Perspectives menu; some perspectives may not show the C/C++ Perspective as an option here and will require that the Other... menu item be selected.
Next Steps
It is recommended that you spend some time familiarizing yourself with the layout of the GUI; read the Eclipse documentation, explore the help contents, and try following some of the tutorials available through the welcome screen. Once you are comfortable with the Eclipse environment, continue by configuring the Eclipse terminal view.
