Difference between revisions of "Using the EMAC OE SDK Projects with Eclipse"
m (Removed extra blank line.) |
|||
| (One intermediate revision by one other user not shown) | |||
| Line 1: | Line 1: | ||
| − | {{todo| | + | {{todo|SEOKWREV;(10.29.13-22:40->MD+)(11.06.13-15:20->JG+);(1.2.14-11:40->MD+);(1.3.14-13:00->MW+);(03.04.14-16:45->BS-);(03.25.14-15:50->BS+)|Klint Youngmeyer|project=oe 4,oe 5,ky,md,bs,SEOKWREV}} |
| + | {{#seo: | ||
| + | |title=Using the EMAC OE SDK Projects with Eclipse | ||
| + | |titlemode=append | ||
| + | |keywords=EMAC OE SDK,Projects,Eclipse,EMAC SDK Example,C and Makefile | ||
| + | |description=Using the EMAC OE SDK projects with Eclipse. | ||
| + | }} | ||
The EMAC OE SDK is distributed with a set of example projects intended to demonstrate how to use the EMAC OE toolchain and libraries. This guide demonstrates the process of compiling one of the example projects and running it on the target machine using the Eclipse IDE. A basic familiarity with Eclipse is assumed for this guide. For a quick intro see the [[First_Time_Starting_EMAC_Eclipse|First Time Starting Eclipse]]. | The EMAC OE SDK is distributed with a set of example projects intended to demonstrate how to use the EMAC OE toolchain and libraries. This guide demonstrates the process of compiling one of the example projects and running it on the target machine using the Eclipse IDE. A basic familiarity with Eclipse is assumed for this guide. For a quick intro see the [[First_Time_Starting_EMAC_Eclipse|First Time Starting Eclipse]]. | ||
| Line 9: | Line 15: | ||
== EMAC SDK Example: Compile and Run the hello Project == | == EMAC SDK Example: Compile and Run the hello Project == | ||
| − | |||
=== Setup === | === Setup === | ||
Latest revision as of 16:29, 18 November 2014
The EMAC OE SDK is distributed with a set of example projects intended to demonstrate how to use the EMAC OE toolchain and libraries. This guide demonstrates the process of compiling one of the example projects and running it on the target machine using the Eclipse IDE. A basic familiarity with Eclipse is assumed for this guide. For a quick intro see the First Time Starting Eclipse.
Contents
Tools Required
- GNU make
- EMAC OE SDK
- wput
EMAC SDK Example: Compile and Run the hello Project
Setup
- Make sure the system is configured for the correct target machine and that the IP and user/password are set.
- Create a remote terminal connection. This is necessary to use the Remote System Explorer's SSH Terminal feature in the following procedure.
- Launch Eclipse and Import the SDK projects if not already done.
Procedure
This guide will compile and upload one of the SDK example projects to a board using make targets. Also, the Eclipse Remote Terminal will be used to run the program.
-
Open C/C++ perspective
-
Click Window → Open Perspective → Other... To bring up a dialog window with a list of Perspectives to choose from.
-
Choose C/C++ and click Ok.
-
-
Open Make Target View
-
Click Window → Show View → Other ... To bring up a dialog window with a list of Views to choose from.
-
Choose Make → Make Target
-
-
Expand projects → hello in the Make Target view.
-
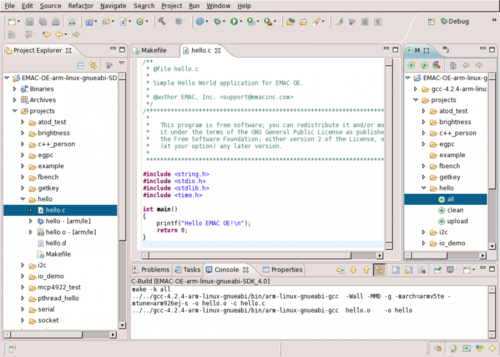
Double-click the all
makeTarget to compile the project. See Figure 1 below.
The all
maketarget tellsmaketo run the compiler to compile all of the source files listed in theCFILESvariable in theMakefile.makewill check the modification times of these *.c files against that of the currently existing executable (if there is one) to see if they have been modified since the last time the executable was compiled. If they have, make reruns the toolchain commands necessary to produce a new executable. For a more in-depth explanation see the | GNU `make' Manual -
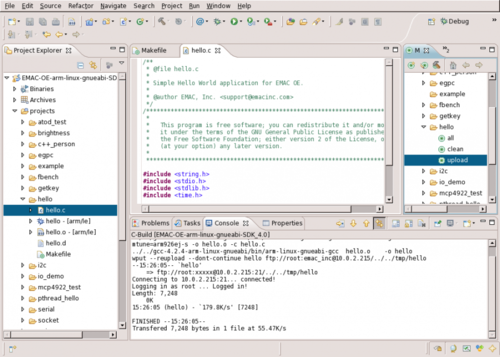
Double click the upload
maketarget to upload the program to the target machine. See Figure 2 below.
The upload
maketarget tellsmaketo use thewputcommand to send the binary to the target machine using the variables stored in theglobal.propertiesfile. -
Now Connect to the target machine.
-
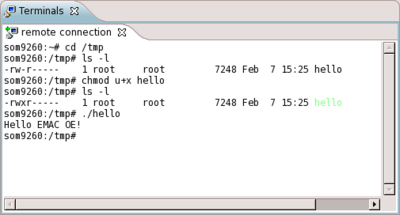
Run the program as shown below using the remote terminal created in the Remote Terminal Setup Guide.
The following is a brief description of each command seen in the SSH Terminal window above:
cd /tmp: Change the current working directory to/tmp/.ls -l: List the current working directory's contents with file permissions shown. Notice that root does not have execute permissions for the filehello.chmod u+x hello: Give executable permissions to the owner of thehellofile. Note that this assumes that the same user is used to log in through the SSH Terminal as was specified inglobal.propertiesaccording to Step 1 of the Setup for this guide; in this example, the user isroot.ls -l: List the current working directory's contents with file permissions shown to be sure that root now has execute permission. The newxindicates thatrootdoes now have execute permissions../hello: Execute the binary. The output shown is a simple message printed to the screen, "Hello EMAC OE!".
Example C and Makefile
See example files for more information about the files used in this procedure.
Next Steps
The next step is to create a new Makefile-based Eclipse project.


