Remote System Explorer SFTP Setup for Eclipse
The Eclipse Remote System Explorer plugin provides SSH File Transfer Protocol (SFTP) capabilities to facilitate the transfer of files between the development machine and the target machine. This includes a GUI service which allows developers to "drag-and-drop" files between the development and remote file systems, and the ability for Eclipse to edit a file within a local editor and update the remote copy when saved.
Contents
Open the RSE Perspective
The RSE plugin provides the Eclipse workbench with a new perspective that facilitates the use of its services. To open this perspective:
- Select Window -> Open Perspective -> Other...
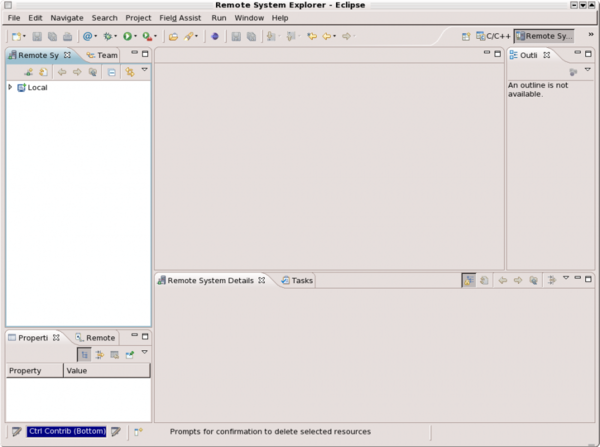
- In the Open Perspective dialog, select Remote System Explorer and click OK. This should result in a screen similar to that shown in Figure 1 below. To add a new connection, follow the instructions for doing so on the RSE Setup Guide.
Transferring Files
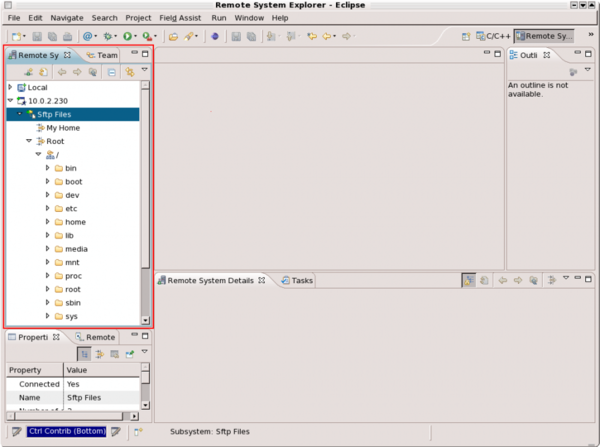
Once a remote connection has been established, it is possible to use the Remote System Explorer View, highlighted in Figure 2 below, to navigate the directories of the remote machine as well as the local machine. This view can also be used to graphically drag-and-drop files between machines.
The drag-and-drop feature of RSE's SFTP facility is no different than that on any other computer. The target file can actually be dragged from its source and dropped into its destination folder using drag-and-drop. Alternatively, the Remote Systems View context menu can be used to copy a file and then paste it into its destination.
| The Remove Systems View can be opened from any perspective by selecting Window -> Show View -> Other... It is then possible to drag and drop between the Project Navigator View and the Remote Systems View. |
Remote File Editing
RSE's SFTP offers the ability to edit a copy of a remote file then automatically upload the contents of that file when it is saved during the edit session. The Remote Systems View also provides the convenience of being able to create a new file on the remote system
Create a New File
To create a new file:
-
Right-click on the directory in the Remote Systems Explorer View where the new file is to be located to bring up a context menu for that directory.
-
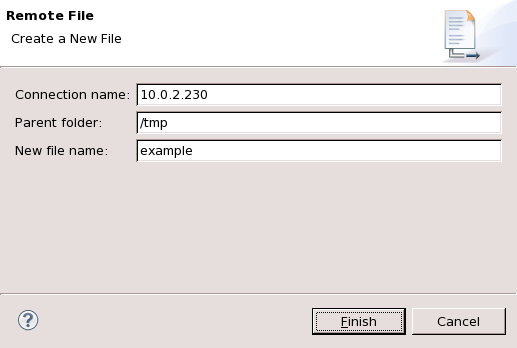
Select New -> File or New -> Folder to create a new file or directory. This will cause the New File prompt to appear as shown in Figure 3 below.
-
Enter the name of the new file in the New file name: field and click Finish to create the file.
This procedure creates a new file in the specified folder, but does not open it in an editor. The next step is to learn how to open the remote file in an editor, make changes, then save those changes on the remote machine.
Edit an Existing File
Once a file exists on the remote machine, RSE provides the ability to edit it on the development machine without having to manually transfer the files between machines.
Open a Remote File
To open a remote file in Eclipse on the development machine:
- Right-click on the file in the Remote Systems Explorer View to bring up the Remote Systems View context menu.
- Click Open. Alternatively, click Open with... to see a list of editors available for that type of file.
The file should open in the Eclipse editor and allow you to make changes.
Save a Remote File
Saving a file during a remote edit session is no different than doing the same during a local edit session. Simply click the Save button or use the File -> Save or File -> Save As... menus. The Ctrl+S keyboard shortcut may be used as well.
Next Steps
After editing and uploading a file on the remote machine, it can be manipulated using an SSH Shell or Terminal -- two additional services provided by the RSE plugin. See the RSE Shell and Terminal Setup page to learn more.


